Tip #1207 – Using Sales IQ to Identify Sales Problems

The dynaMACS  Sales IQ feature is a powerful tool that allows you to monitor and analyze all of your sales and commission performance.  Did you know you can also identify customers that have not bought in a period of time?

Example

In the following example we will look at a quick and simple way in Sales IQ to see what customers have not purchased from a particular manufacturer in the past three months.

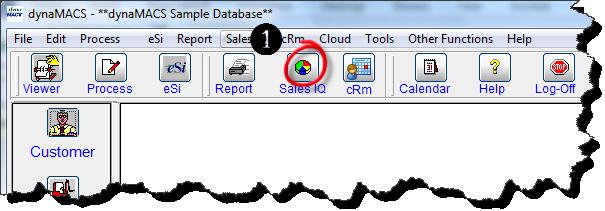
  1. From the dynaMACS main screen select the Sales IQ button.Main Screen
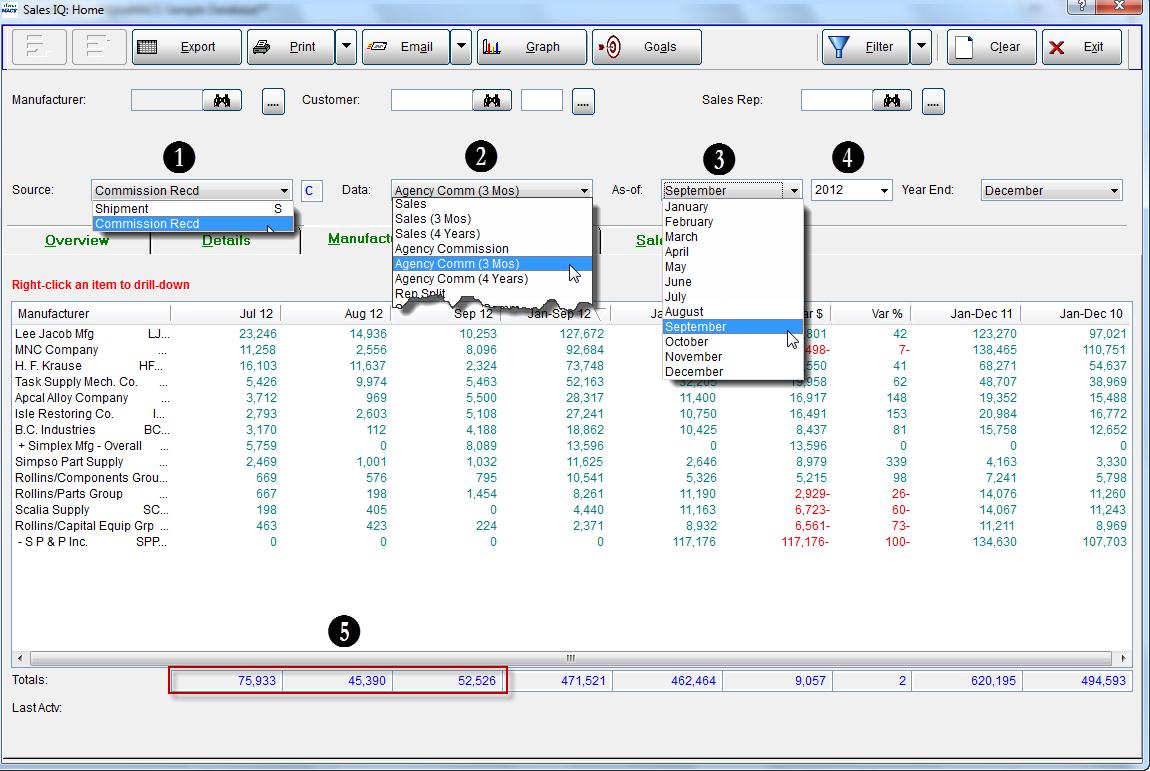
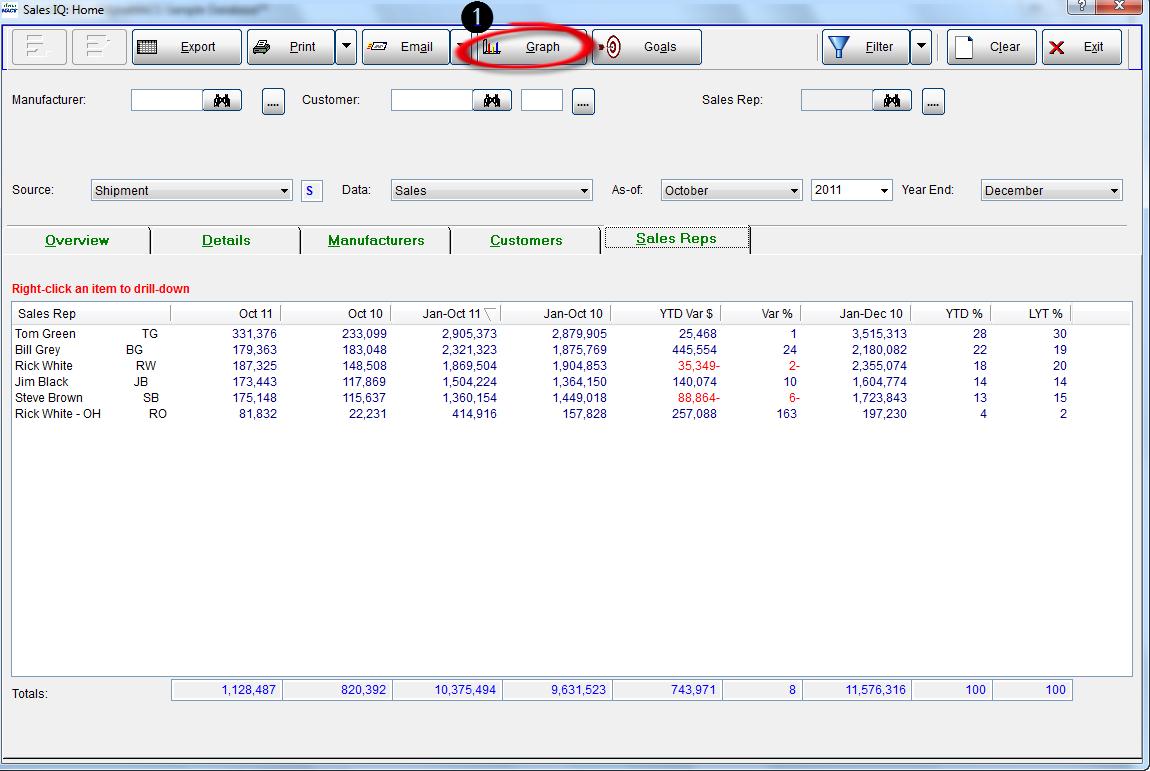
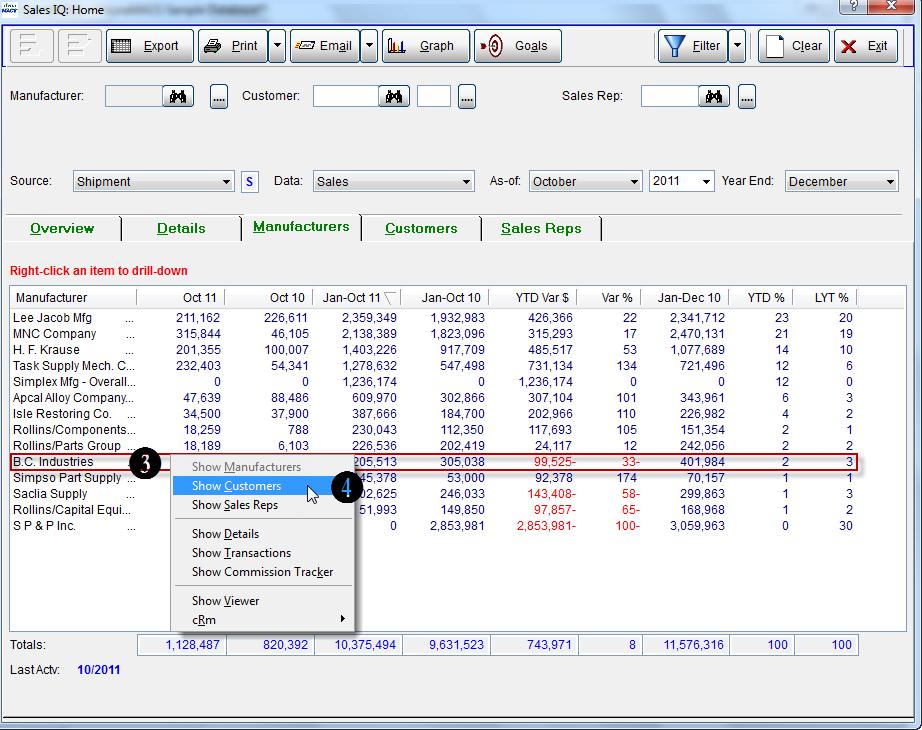
  2. From the Sales IQ Home screen select the Manufacturers tab.Sales IQ Home 1
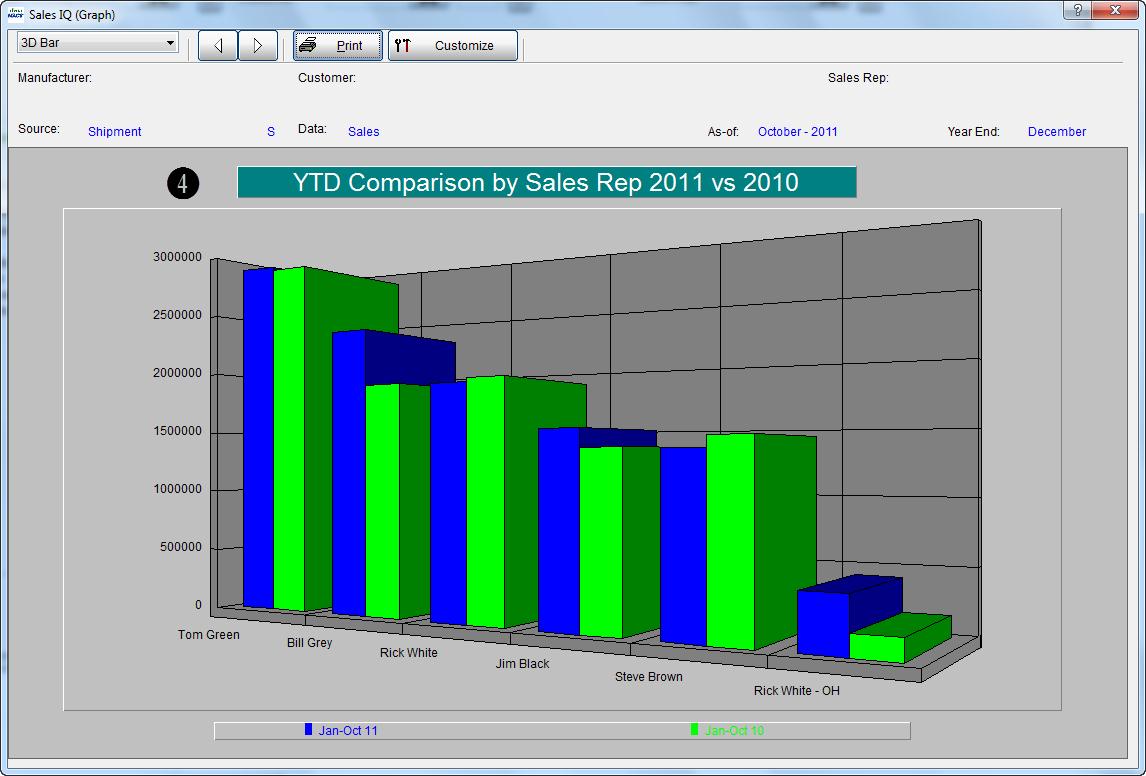
  3. As you can see in the list of manufacturers displayed below, there are 4 manufacturers with a negative YTD Variance, B.C. Industries being one of them.
  4. To view the customer sales activity for this manufacturer we will select and right click on the manufacturer B.C. Industries and then select Show Customers from the drop down box.Sales IQ Home 2
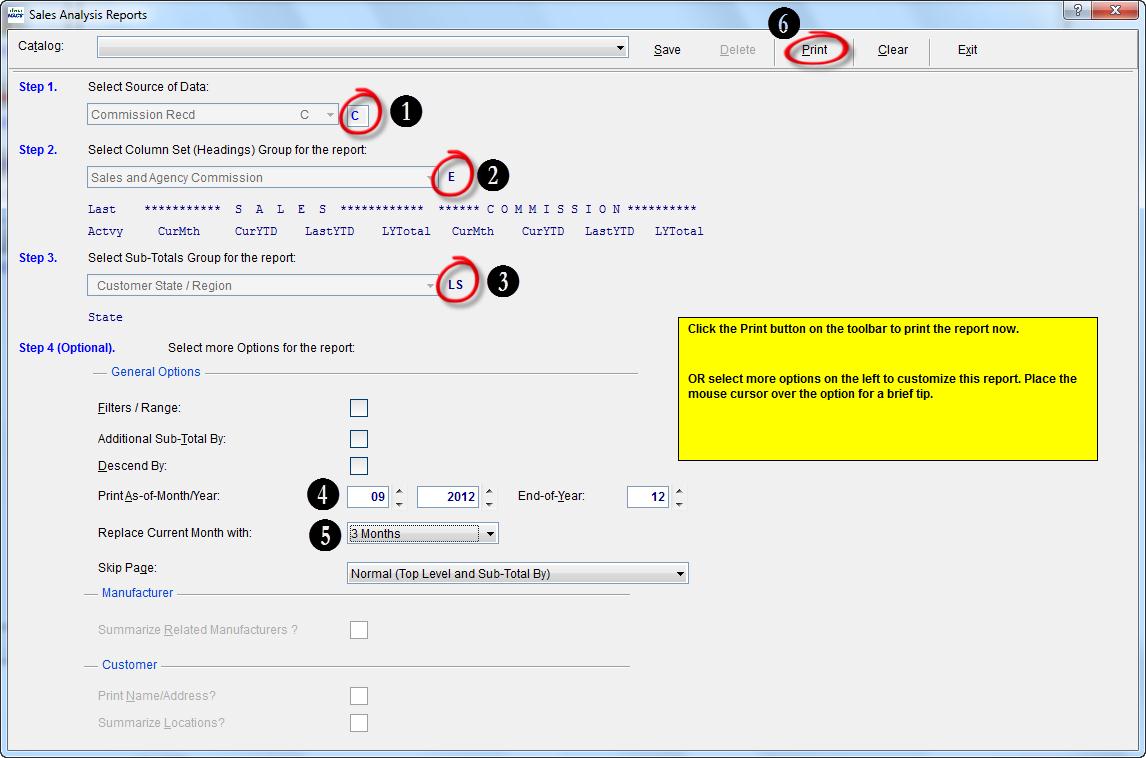
  5. From the Sales IQ:  Drill-Down (1) Manufacturer>Customers screen select 3 Months from the No Sales Activity In: drop down box which is in the lower right hand corner of the screen.
  6. Select the Refresh button.Sales IQ Home 3Note
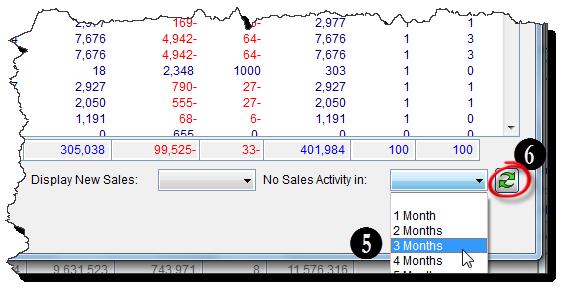
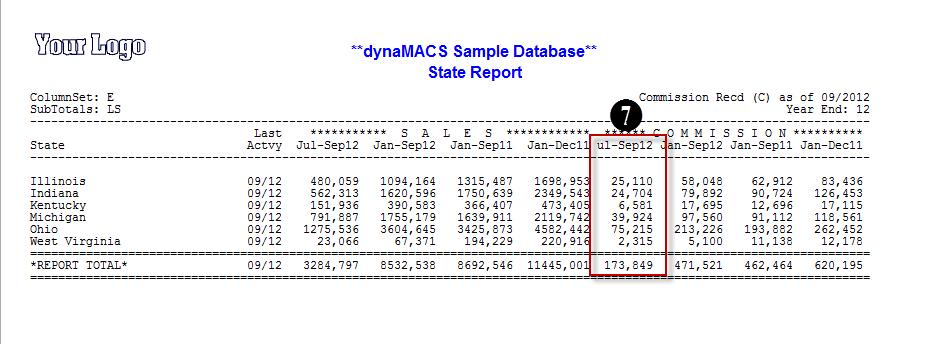
  7. The list will refresh displaying the 15 customers that buy from B.C. Industries that have NOT purchased in the past 3 months.
  8. As you can see, the YTD Variance is a negative value in most cases.
  9. The customer All Others displays the combined values of all other customers that HAVE purchased from B.C. Industries in the past 3 months.
  10. The last two columns show what percent of the total sales for B.C. Industries each customer represents, this Year-To-Date and Last Year Total.  Using these values you can determine the significance of each customer.Sales IQ Home - Drill Down 1
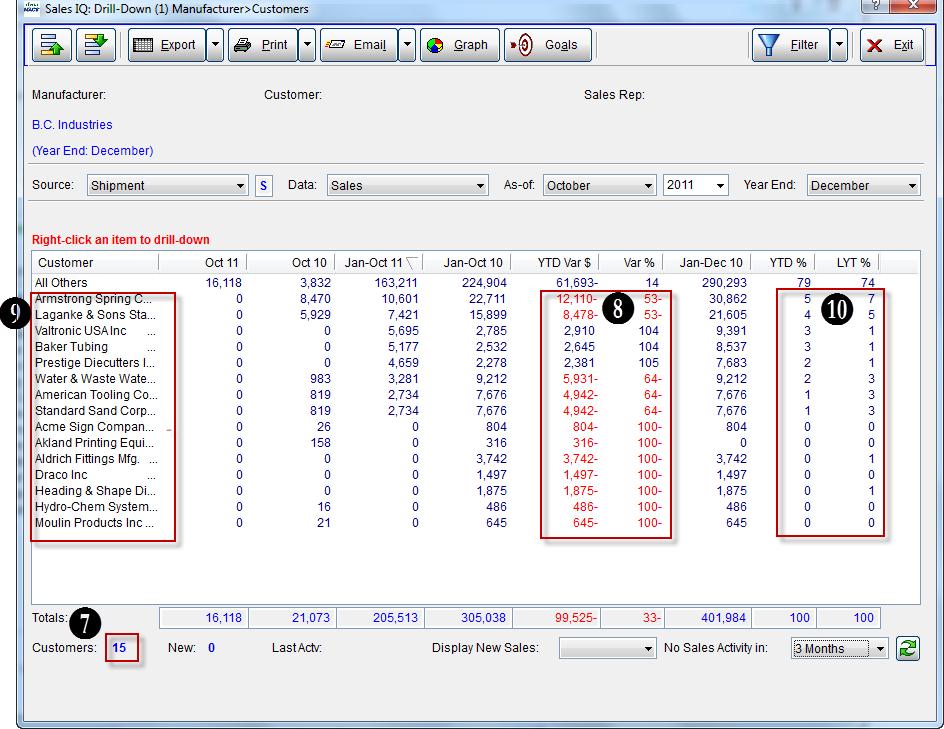
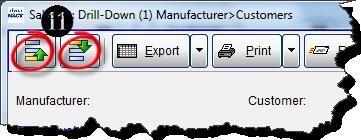
  11. By using the Up  or  Down  arrows in the upper left hand corner of the screen you can quickly go from manufacturer to manufacturer to identify other customers meeting the same criteria of no sales in 3 months.Sales IQ Home - Drill Down 2

Tip #1206 – dynaMACS Quarterly Tax Reporting

In dynaMACS Sales IQ you can retrieve quarterly commission numbers which can assist you in expediting your tax reporting.  If you need to report by state, you can do so by using the Sales Analysis reports feature OR filter by state/region in Sales IQ.

Sales IQ Agency Comm (3Mos) – Example

In the following example we will generate a report using Sales IQ for quarterly commissions by manufacturer for commissions received July – September 2012.

  1. From Manufacturers tab in the Sales IQ screen select Commissions Received from the Source drop down list.Note: If you do not have the Commission Reconciliation module then you can pull the data from Shipments vs. Commissions Received.
  2. Select the Agency Comm (3 Mos)option from the Data drop down list.
  3. Select September from the As-of drop down list.
  4. Select 2012 for the As-of year from the drop down list.
  5. The quarterly commissions received will appear in the column Totals for Jul 12, Aug 12,u Sep 12.Sales IQ Home

Sales Analysis Commission Received by State – Example

In the following example we will generate a report using Sales Analysis for quarterly commissions by state for commissions received July thru September 2012.

  1. Select Commission Rec’d from the Selected Source of Data drop down list box.Note: If you do not have the Commission Reconciliation module then you can pull the data from Shipments vs. Commissions Received.
  2. Select Sales and Agency Commission from the Select Column Set (Headings) drop down list box.
  3. Select Customer State/Region from the Select Sub Totals Group drop down list box.
  4. Enter 09 and 2012 in the Print As-of Month/Year
  5. Select 3 Months from the Replace Current Month With drop down list box.
  6. Select the Print button.Sales Analysis Reports
  7. The following report is displayed showing the commissions received for Jul – Sept 12 by state.State Report

Tip #1205 – Did you know that you can share eSi data maps with other agencies that are using dynaMACS eSi?

If you share a manufacturer with another agency that uses dynaMACS eSi, you can easily exchange data maps without the risk of sharing your agency data.  Using the Send Map and Receive Map* options in dynaMACS will eliminate having to create new maps.  The following examples will explain how to send and receive maps to and from other agencies.

Sending a Map to another Agency

Sending a map to another agency requires that you have created and saved a map in dynaMACS eSi.

  1. From the dynaMACS main menu, select eSi then Send Map from the drop down menu.Main Screen 1
  2. From the Export Catalog dialog box select the file to be exported
  3. Select the Export button.eSi Import Catalog Record
  4. The file location of the exported map will be displayed in the FYI dialog box.  Select the OK button.FYI Diolog Box 2
  5. Once the file has been exported you can email it to the agency that you are sharing it with.

Tip #1204 – Getting More out of Your Sales IQ Graphs

As you know, dynaMACS Sales IQ has powerful graphing capabilities. You can create a colorful graph for virtually any combination of information that is available to you in Sales IQ. Here are a couple of things to increase your graphics experience.

  • The ability to change the default title of your graph
  • Using the Copy to Clipboard feature which allows you to paste your graph into an email, Microsoft Power Point presentation, Microsoft Word document, or any other word processing document.

The following tips will help you better understand how to use these Graph features in dynaMACS.

Changing the Default Title on a Graph

In the following example we have selected the Sales IQ button and then selected Sales Reps tab.

  1. Select the Graph button from the Sales IQ screen.Sales IQ Home
  2. After selecting the data to be included in the graph, override the default Graph Title with the desired title.
  3. Select the Graph button.Select Columns To Graph
  4. You will see the newly created graph with the overridden Graph Title.Sales IQ Graph

Copy to Clipboard Feature

The dynaMACS graphing feature allows you to copy and paste any graph that you have created in dynaMACS into an email or other document.

  1. From the Sales IQ Graph screen select the Customize button.Sales IQ Graph 2
  2. In the Customize Graph screen select the System tab.Customize Graph
  3. Select the desired Format.
  4. Select Clipboard for a target.
  5. Select the Copy button.Export Image
  6. Your graph is now on the clipboard and ready for pasting into the desired document by using that applications paste function (or by using Ctl V on your keyboard while in the application.)

Tip #1203 – Understanding Preference Settings in dynaMACS

User Preferences in dynaMACS is a way for individual users to set certain preferences for their own purposes.  For example, a user may want to have his/her dynaMACS timeout (log them off) after 10 minutes of non-use. Or, they may want to always print their reports landscape vs. portrait. These are just some of the options that can be set in the User Preferences option in dynaMACS.

The following tips will help you better understand how to set up the preferences that best suit your needs as a dynaMACS user.

Accessing User Preferences

  1. From the dynaMACS main screen select File>Preferences.Main Screen - Preferences
  2. The User Preferences screen is displayed as shown below.

List of User Preference Descriptions

dynaMACS_Preferences

Note 1

By using the Preferences utility in dynaMACS you can set your logo to print on your reports. It is suggested that the bitmap format is 160 x 80 Pixels.

  1. From the User Preference(s) screen with the Preferences field selected for #5 Default Bitmap to print on Reports, select the Browse button at the bottom of the screen to find the location and file name of the .bmp file for your logo.User Preferences 2
  2. From the dialog box select the .bmp file (in this example we are using YourLogo.bmp.
  3. Select the Open button.Default Bitmap to Print on Reports
  4. You will see the path and file name appear in preference field #5.
  5. Select the Save button and then select the Exit button.User Preferences 3

Change the dynaMACS Timeout (Log off)

The timeout default in dynaMACS is “00” minutes which means that it DOES NOT time you out. You can modify this by changing the Timeout in Minutes feature in Preferences.

  1. From the User Preference(s) screen select the value of 30 from the drop down list in the Timeout in Minutes field.
  2. Select the Save button and then select the Exit button.User Preferences 4

Tip #1202 – Understanding Security Features in dynaMACS

As in other businesses, many agencies may want to restrict access to certain confidential information stored in dynaMACS. For example, it may be necessary to restrict commission information from being seen by the general user community and only visible to management and the sales rep. In dynaMACS we have made it simple to set up your user security.

Security in dynaMACS is controlled through predefined security classes. You can assign one or more classes to each user ID. Each class has a unique function and controls access to certain screens or programs in the system. System Administrators should become familiar with each class before creating new users in the system.

The User/Class Maintenance screen is also used to reset a user password should they forget their password.

The following information and tips will help you understand how to best utilize the User/Class Maintenance.

Accessing the User/Class Maintenance Screen

  1. From the dynaMACS main screen select Other Functions>Security>User/Class Maintenance.dynaMACS Main Screen
  2. The following displays the User/Class Maintenance screen.User Class MaintNote

Once you have selected a User ID from the drop down list you can then add a security class by highlighting it in the Known Security Classes list and selecting the Add Class button, OR you can remove a security class by highlighting it in the User Security Classes list and selecting the Remove Class button.

List of Security Classes

Below is a reference list of Security Classes available in dynaMACS. The user class ADMIN allows FULL rights to all functions listed below. The chart below suggests the classes that you may want to assign to Office Manager, Data Entry users and Sales Reps.

Security_Classes

Restricting Access to Certain Information

By selecting specific User Security Class codes you can restrict access to different functions and views within dynaMACS.

    • The following example shows a sales rep (JIMB) with the following User Security Class codes assigned:
      • VIEW (View Controls) Required for update capabilities in Customer, Manufacturer and Sales Rep Viewer.
      • REPORT_IQ (Sales IQ)
      • VIEWER_CUST (Customer Viewer)
      • VIEWER_MFG (Manufacturer Viewer)
      • VIEWER_REP (Sales Rep Viewer)

      User Class Maint 2

      Note 2

    • Below is the menu and toolbar on the main dynaMACS screen logged in as JIMB. As you can see, there are features that are NOT accessible to JIMB. These are the menu items and icons that are not activated or “grayed out”.dynaMACS Main Screen 2

By referring to the list of Security Classes in the previous section, you can determine the level of security that best fits each user.

Resetting a User Password

You can reset the user’s password to the same as their Login ID which will prompt the user to then create a new password the next time they login.

    1. From the User/Class Maintenance screen, bring up the User ID that needs to be reset.
    2. Check the Reset Password to Same As User-ID box.
    3. Select the Save button and then the Exit button.User Class Maint 3
    4. Upon logging into dynaMACS again the user would enter the User ID and current Password.
    5. When prompted, the user enters the New Password and then Confirms Password in the Password Change dialog box.dynaMACS Main Screen 3