Posts

Case Study: Mega Western

 “With dynaMACS, we are able to create reports
faster and easier than any other method we’ve tried.”

Dawn Farabee, Office Manager
Mega Western

Mega_Western_LogoClient Challenge

Mega Western’s previous agency software was no longer being supported or updated. When Mega Western had questions or needed help, they were left to their own devices. As time went by, the agency quickly knew it was time for new sales agency software.

Mega_Western_StatisticsdynaMACS Solution

With dynaMACS, Mega Western has software that is updated regularly and the agency can call when they have questions and need support.

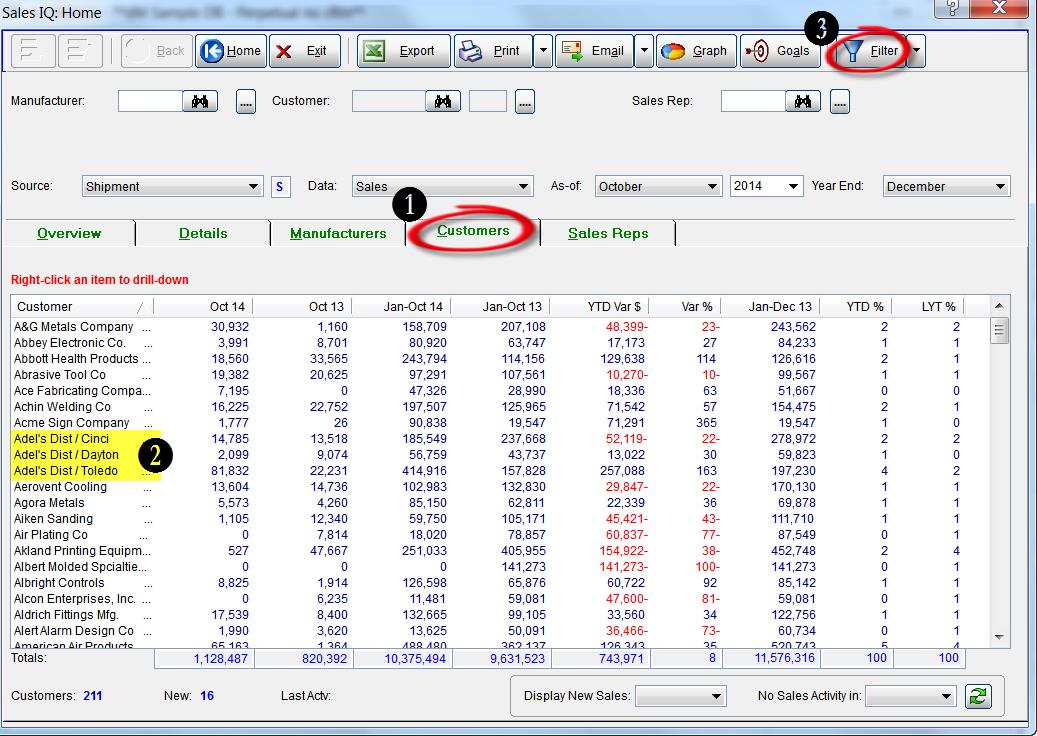
With Sales IQ, the dynaMACS analysis tool, the agency can view information such as sales, commission and performance data. Mega Western sees data such as:

  • Recent sales activity by customers
  • Sales or commissions by factory
  • Manufacturers, sequenced by year-to-date sales
  • Five-year sales history for any combination of manufacturer, customer or sales rep
  • Sales rep performance

Administrative assistant Leanne Waestman says the ability to see which customers are performing well and which are down is very helpful for Mega Western.

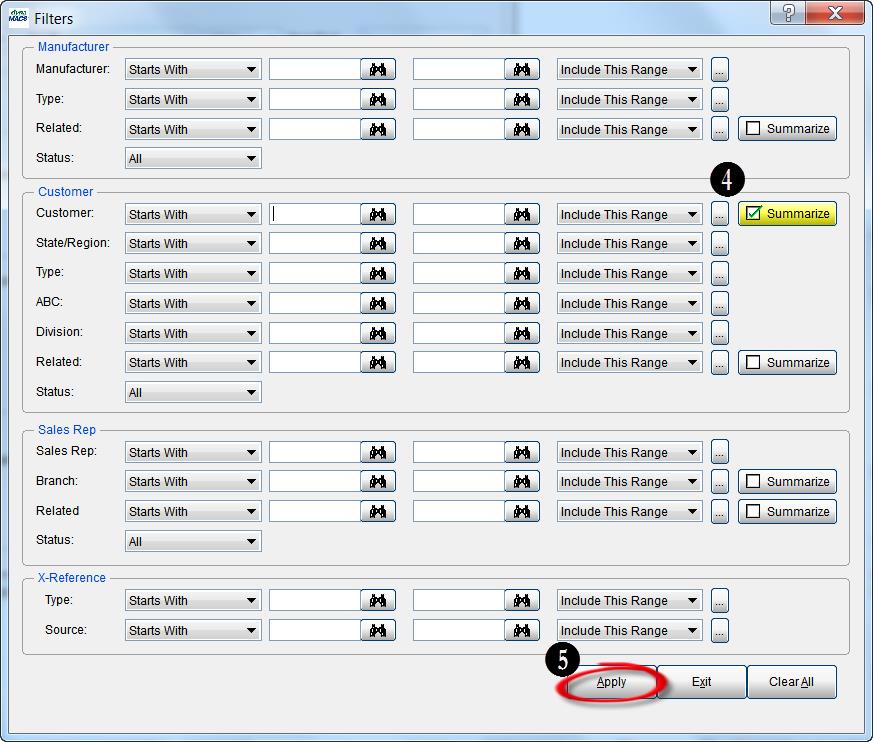
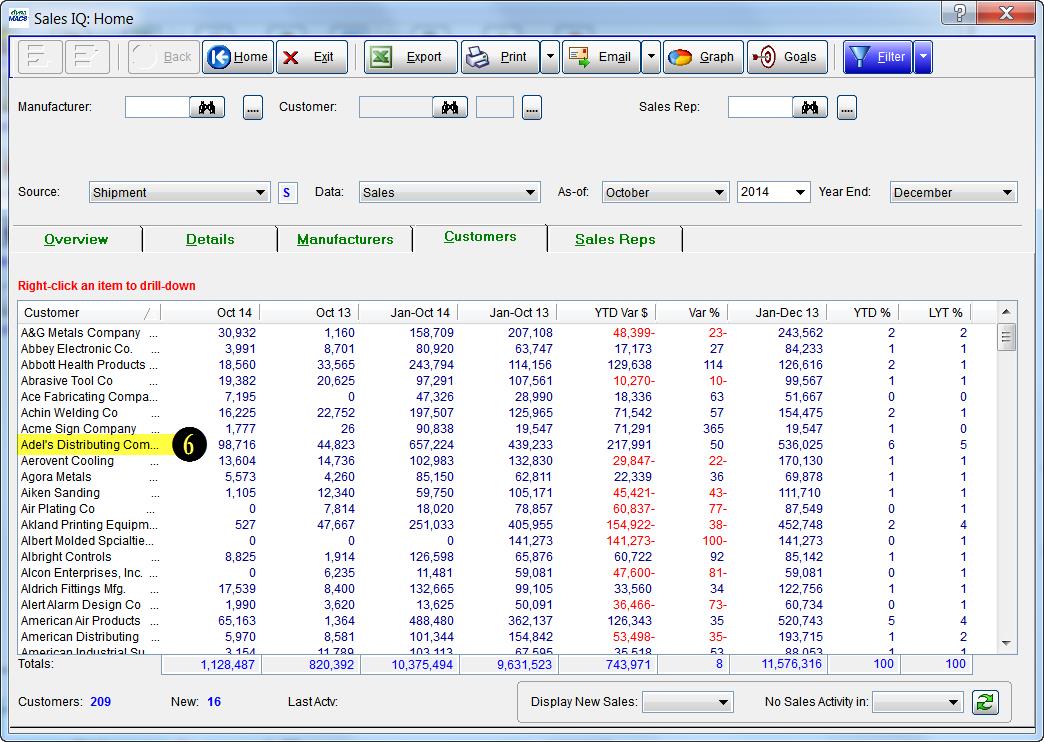
dynaMACS also provides the ability to drill down to more detailed data. If a sales rep asks for a particular type of information, the agency is able to provide a detailed – or high-level report.

Office Manager Dawn Farabee says dynaMACS is easier than getting reports any other way– far faster than aggregating data manually. “Creating reports manually would take a lot longer.”

Tip #1501 – dynaMACS HELP Options

The dynaMACS Help menu provides several resource options for information and quick access to assistance within the dynaMACS program.  The following tip will explain the options available.

  1. You can access the Help menu from the menu bar.HelpMenu_Image
  2. Selecting the What’s New… option will open a PDF document that contains information about new functionality in your version of dynaMACS.
  3. Selecting the Previous Release Notes option will open a sub-menu listing available previous release notes in PDF format which details the fixes and enhancements for each release.Help Menu 3
  4. Selecting the Getting Started option will open a PDF document that discusses the pertinent “getting started” subjects when first using the dynaMACS application.Getting Started
  5. Selecting the dynaHELP option will open a PDF document that contains help on functionality of all features of dynaMACS.dynaHELP
  6. Selecting the Remote Support option will open Team Viewer which is a remote access program.  This feature should only be used when talking with a member of the dynaMACS support team.  This will allow dynaMACS support to connect directly with a dynaMACS user during a support call.Remote Support
  7. Selecting the FAQs on the web option will launch your web browser and go directly to the Frequently Asked Questions page on dynaMACS.com.FAQ's
  8. Selecting the Live Demos on our website option will launch your web browser and go directly to the demos page on dynaMACS.com.LiveDemoImage
  9. Selecting the Show Tips option will open the dynaMACS web site displaying all of the dynaMACS Support Tips.  Here you can enter a key word search in the Search Tips field or simply click on a tip from the list.Show Tips
  10. Selecting the Register dynaMACS option will open the Register dynaMACS screen to email your registration to dynaMACS.  This is typically done only when a dynaMACS Support Team representative advises that this be done.Register DM
  11. Selecting the Check for Software Update… option will close your dynaMACS program and open an update program.   It is advised that you check for software updates on a monthly basis.CheckforSoftwareUpdate
  12. Selecting the About dynaMACS option provides information about dynaMACS software.About DM

Tip #1412 – dynaMACS End of Year Checklist

The end of year is an ideal time to review your dynaMACS database.  The following checklist will help guide you to areas that may benefit from a review.

Manufacturer:

Mfr_Status

Commission_Rates

X-Ref_Override

Sales Reps:

SalesRepsSplits


Customer:

Cust_Rep_Assignments

Cust_Classifications


Customer_Status

Customer_Transfer

Goal Tracking**:

Goals
Goals_Seasonality

Disclaimer

Tip #1411 – Using Smart View in dynaMACS

 Smart View is a feature in dynaMACS that lets you view customers with sales history for a selected manufacturer.  This feature is available from the Sales Entry and the Locator screen.

Example of Using Smart View in Sales Entry

    1. From the Sales Entry screen with a manufacturer selected (the manufacturer LJM has been selected for this example), click on the Customer Search button to display the list of ALL customers.
    2. Notice that in this example there are 287 customer records.Sales Entry - Cust Viewer 1
    3. Click on the Smart View check box to display only customers with history for this manufacturer.
    4. Notice that in this example there are now only 72 customer records displayed.  These are the customers with sales history.Sales Entry - Cust Viewer 2

Example of Using Smart View from the Locator

      1. From the Locator screen enter a manufacturer code i.e. LJM.
      2. Select the Locate button.Locator
      3. Notice that in this example there are 287 customer records.  This displays ALL customers.Customer Viewer 1
      4. Click on the Smart View check box to display only customers with history for this manufacturer.
      5. Notice that in this example there are now only 72 customer records displayed.  These are the customers with sales history for Lee Jacob Mfg.Customer Viewer 2

Case Study: Paragon Sales and Marketing

 “dynaMACS is a one-stop-shop for sales and commission data. It’s a level of knowledge that helps our business run more efficiently.”

Matt Shearman, Co-Vice President
Paragon Sales and Marketing

Client Challenge

Paragon Sales & Marketing previously had the tedious process of manually entering mounds of data from manufacturer commission statements: industry type, customer, manufacturer, amount, date…the list goes on.

When Paragon bought out another agency, the number of lines and people doubled. “The inefficiency of manual data entry was unacceptable,” says Co-Vice President Matt Shearman.


ParagonSalesandMarketing_StatisticsdynaMACS Solution

When he saw a dynaMACS demonstration at a trade show, he was amazed at the ease with which manufacturers’ data could be imported automatically, practically eliminating data entry.

Next he saw how he could breeze through the screens to get any numbers the agency might need. He saw the ease with which data on sales and commissions, sorted any way he wanted – by manufacturer, customer, sales rep – was available.

There are dozens of layers to the information, and every data point enables Paragon to click and go deeper into the data.

“It’s a level of knowledge that helps our business run more efficiently,” Shearman says. “The near elimination of data entry alone saves money.”

What do the sales reps think? “They love it. They ask for an email report and they have what they need right away.”

Reporting capabilities are also of tremendous value to reps, who during quarterly sit-downs with wholesalers can print sales reports. “We have easy-to-read reports showing where they are selling well and identifying opportunities for improvement.”  

“It’s a tremendous help to us in so many ways,” Shearman says.

Tip #1409 – Using Customer Locations in dynaMACS

Some agencies have the need to separate sales numbers within a customer for reasons such as:

  • Multiple buyers that are responsible for making buying decisions for different manufacturers
  • Giving credit to different reps for something shipping to a different location
  • For these purposes, dynaMACS gives you the ability to add multiple locations to a customer.  If locations are used, you can use the Filters feature to display these numbers in Sales IQ summarized, displaying them as combined under one customer, or you can display the sales numbers for the individual locations.

Filtering on Locations in Sales IQ

When displaying sales activity for a customer in Sales IQ you can view all sales activity by customer location (default) or you can summarize sales by using the Filter button.

In the following example we will look at the customer Adel’s Dist which has three locations.

  1. From the Sales IQ Home screen the Customer tab has been selected showing all customers and the sort is on the Customer column.
  2. You can see that there are three Adel’s customers displayed by individual locations.
  3. Select the Filter button.Sales IQ Home Screen 1
  4. Check the Summarize box to the right of the Customer field.
  5. Select the Apply button.Filters Screen 1
  6. The Sales IQ screen now displays all Adel’s locations summarized and totaled.Sales IQ Home Screen 2

To Create a Customer Location

The following example explains how to add a location to an existing customer.

  1. Select the Viewer icon.
  2. Select the Customer icon.dynaMACS Home Screen
  3. Highlight the Customer that you will be adding a location to.
  4. Select the Add Location button.Customer Viewer Screen 1
  5. In the Customer Maintenance screen you will notice that the customer information from the selected customer will be defaulted i.e. the address, phone #’s, etc.  Make any changes required for your new location and select the Save/Exit button.NoteCustomer Maintenance Screen
  6. The newly added location is displayed in the Customer Viewer list.
    Customer Viewer Screen 2