Posts

The release of AccountReporter Analytics by Empowering Systems

Southborough, MA, June 19, 2019 – Empowering Systems, Inc., is pleased to announce the release of AccountReporter Analytics™.

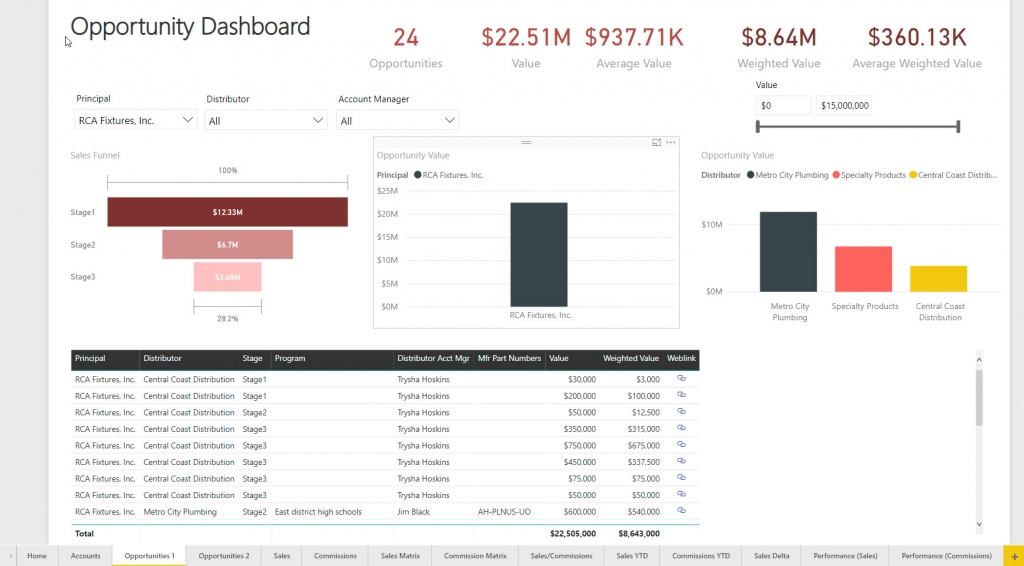
Empowering Systems, a leader in CRM solutions for manufacturers and manufacturers’ representatives since 1994, announces the release of their industry leading AccountReporter Analytics. Powered by Microsoft Power BI® these interactive analytics dashboards reveal opportunity and sales data from AccountManager and SalesAnalysis in ways never before possible. These dashboards give owners valuable business intelligence to measure success, show trends and find the most profitable partners.

Offering solutions that you requested


AccountManager 365 Add-In(CRM from your inbox):

  1. Sell from Microsoft Outlook. Update your opportunities, contacts, accounts and more right in your Outlook in-box on your PC, Mac or phone.
  2. Contacts in one place. Update your contacts in Outlook from the AccountManager Add-in and the other applications will update.
  3. Unclutter your Outlook folders. Email Attachments sync over to AccountManager. One place to find the information you are looking for.
  4. Use the Planner to help organize your team’s workflow. Use the planner to help your team work smarter not harder.


Missed the other blogs regarding our extended capabilities:

AccountManager (CRM)

SalesAnalysis (Sales, Commission and Order Management)

Contact us today to learn more!


             Now offering even more capabilities


AccountManager (CRM):

  1. Sell from Microsoft Outlook. Update your opportunities, contacts, accounts and more right in your Outlook in-box on your PC, Mac or phone.
  2. Sell from your phone. Update your opportunities, contacts and more with voice to text as you walk out of meetings with our new AccountManager App. Then sync your opportunity with your principal’s Salesforce CRM in one click.
  3. Create a custom layout for each Principal. Create custom opportunity layouts so that you hit the target and maximize user productivity with just the fields that are required.
  4. Manage Quotations. No more hunting for quotations, simply link them to your opportunity, so they’re where they need to be. You won the business, turn the quote directly into an order.

Keep an eye out for more in our upcoming blog:

AccountManager Office 365 (CRM from your In-box)

SalesAnalysis (Sales, Commission and Order Management)

If you can’t wait contact us today!

Tip #1605 – Analyze Sales & Commission data for Multiple Customers in a specific Buying Group

By relating customers to a “buying group” customer, you can analyze the combined sales and commission totals for all the related customers. In addition, you can summarize the buying group into one total while looking at all your customers by selecting the summarize box next to the customer Related field for the filter.

Relating Customers

  1.  From the Customer Viewer screen highlight the customer to be related and select the Edit button.Customer Viewer
  2. In the Related-To field enter the Customer Code to relate this customer to or search for the customer code by using the Binoculars button.
  3. Select the Save/Exit button.

Customer Maint Screen

Filter Sales IQ to See Related Customer Activity

  1.  From the Sales IQ screen select the Filter button.Sales IQ Home Screen
  2. In the Filters screen enter the Related customer code in the Starts With and Ends With fields. In this example we are using ABC Buying Co (customer code BUYGRPAB).  You can search for the customer code by using the Binoculars button.
  3. Select the Apply button.Filters Screen
  4. The Sales IQ Home screen will appear.  Select the Customer tab.  The detailed activity for those customers related to ABC Buying Group will be displayed.Sales IQ Home Screen 2
  5. If you would prefer to see summarized information, go back to the Filters and select the Clear button and then the Summarize button to the far right of the Customer Related field.
  6. Select the Apply button.Filters Screen 2
  7. The Sales IQ Home screen will appear with the summarized activity for all customers.  You will notice the ABC Buying Group summarized on the first line highlighted below.Sales IQ Home Screen 3

Tip #1604 – Did you Know that the Customer State and City can be Printed on Your Sales IQ Reports?

When selecting the Print button from the Sales IQ Customer screen, the report does not display the customer’s state and city as you can see in the example below.  This tip will give you instructions to change your printing options enabling you to print that information on the Sales IQ Customer report.

Example

Sample Report 1


Printing the Customer State and City on the Sales IQ Report

  1.  After making selections defining your Sales IQ customer query, click on the Down Arrow button to the right of the Print button.Sales IQ Screen 1
  2. Choose Select from the drop down box.Sales IQ Screen 2
  3. You will see that the Print button has now changed to a Select button.  Choose the  Select button.Sales IQ Screen 3
  4. A Printing Options box will open.   From here you to change your default printer and edit other printing options.
  5. Select one of the checkboxes under Print State/City? You can choose print Beside Customer Name which will print the city and state to the right of the customer name.  Or, you can choose On the Next Line which will print the state and city on the line below the customer name.  (See the examples below to view the layout of each of these options.)
  6. Select the Print button.

Printing Options

Example of Printing State and City Beside the Customer Name:

Sample Report 2

Example of Printing State and City on the Next Line:

Sample Report 3

Tip #1603 – How to Delete a dynaMACS Mobile User

You must first delete the mobile user from the dynaMACS Mobile Configuration screen and then delete it from the User Class Maintenance screen.  Below are the steps required to delete a dynaMACS Mobile user.

Delete a Mobile User from dynaMACS Mobile Configuration

The first step is to delete the mobile user from the dynaMACS Mobile Configuration screen.

  1.  From the main dynaMACS screen select Other Functions>Administration>dynaMACS Mobile Configuration.DM Main Screen
  2. From the dynaMACS Mobile Configuration screen, enter the serial # of the user that you wish to delete.
  3. If you don’t know the serial number, you can use the Arrow buttons at the bottom left of the screen to look through all of your mobile users until you find the correct one.Mobile Config Screen
  4. With the mobile user displayed in the dynaMACS Mobile Configuration screen, select the Delete button at the bottom of the screen.Mobile Config Screen 2
  5. Confirm that you wish to delete this user by selecting the Yes button in the confirmation dialog box.Confirmation Dialog Box

Note_dynaCARE

The mobile user has now been deleted from the dynaMACS Mobile Configuration screen.

Delete a Mobile User from dynaMACS User Class Maintenance

The last step is to delete the mobile user from the dynaMACS User Class Maintenance screen.

    1.  From the main dynaMACS screen select Other Functions>Security>User/Class Maintenance.

      DM Main Screen 2
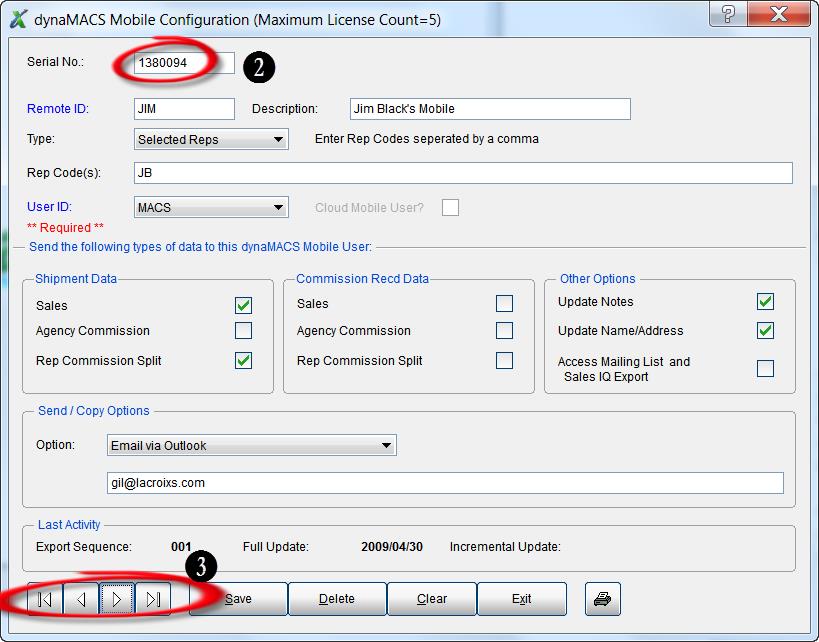
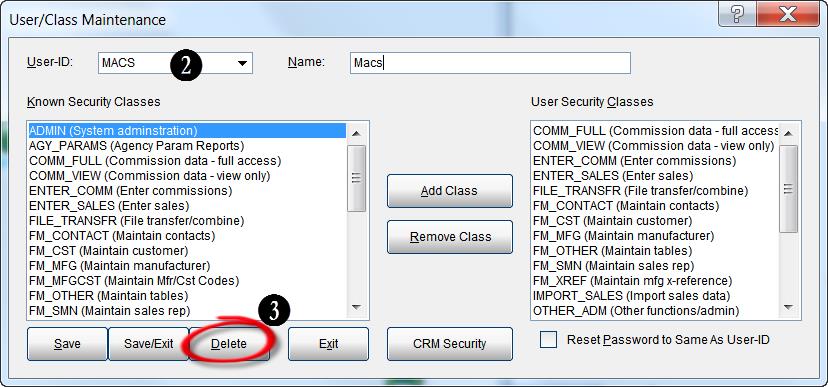
      2.  Enter the Mobile User ID or select it from the drop down list in the User-ID field.
      3.  With the correct Mobile User ID selected, click the Delete button.User Class Maint Screen