Posts

Tip #1706 – Are you constantly changing the “display by” search in the customer viewer?

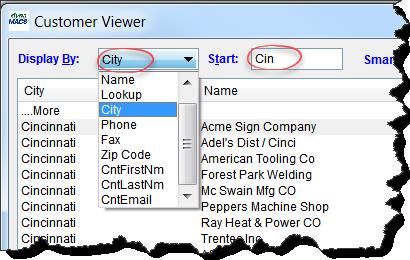
The Display By field in the dynaMACS Viewer screens defaults to “Lookup” which lets you enter the first few characters of the Name i.e. manufacturer, customer or sales rep name in the Start field which will display a list based on that entry.

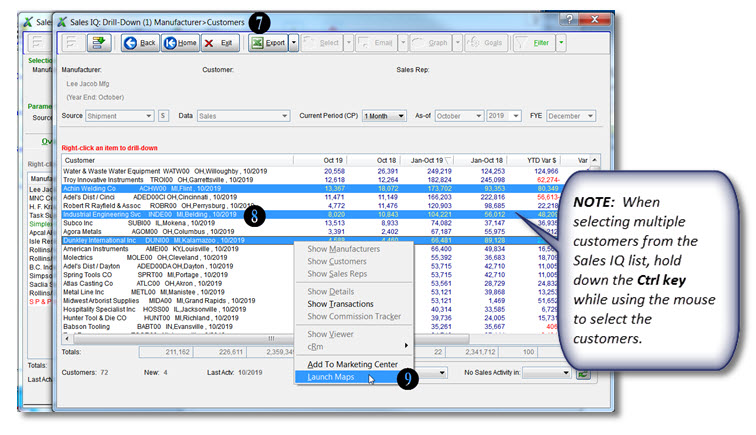
You can change this default temporarily by selecting the down arrow in the Display By field while in the Viewer screen.  This will change the Display By for the current viewing session.

You can also change the default so that every time you access the Viewer screens it will default to your personal selection.

To Change the Default Display By Field for the Viewer Screens

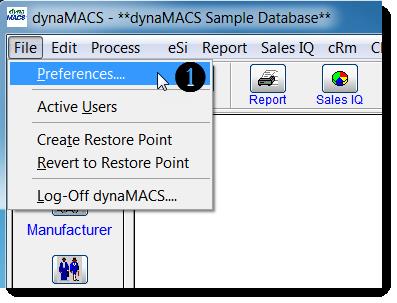
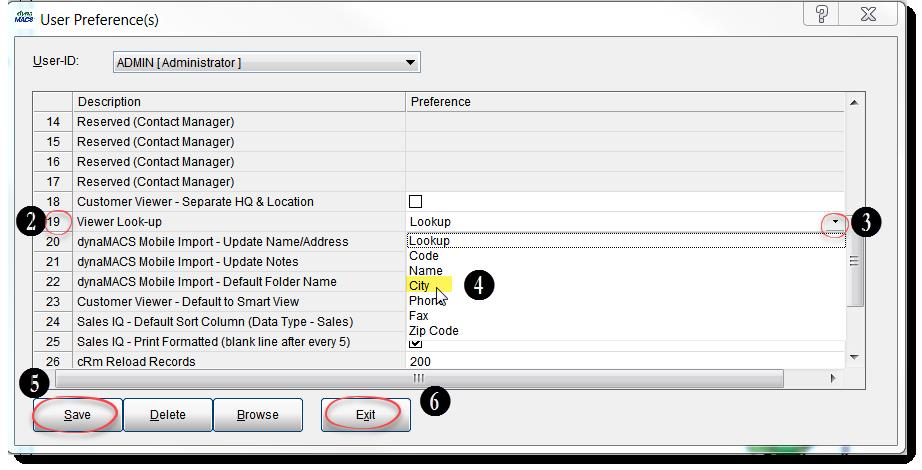
  1.  From the main dynaMACS screen select File>Preferences.

  2. From the User Preference(s) screen, scroll down to #19 Viewer Look-Up.
  3. Select the drop down arrow to the far right of Viewer Look-Up.
  4.  Select the field which you would like your default Viewer Look-Up to be ( i.e. City).
  5. Select the Save button.
  6. Select the Exit button.

Now when you access any of the viewer screens the Display By field will default to that selection.

Tip #1702 – Organizing Your Agency Workflow to Accommodate all the Various Manufacturers

One of the many challenges sales agencies face is dealing with the many forms and documents received from each of the manufacturers that the agency represents. Whether a document gets entered into dynaMACS, QuickBooks or just filed, it is helpful to document the process for each unique manufacturer document received.  We suggest that you create a binder with a tab for each manufacturer and use the form below (or something similar) for each document.

Create a Binder

  1. Set up a binder with a tab for each manufacturer.
  2. Behind each tab you should have the dynaMACS Manufacturer Document Workflow Worksheet (example below) and examples of all other documents you receive from the manufacturer.
    Example:
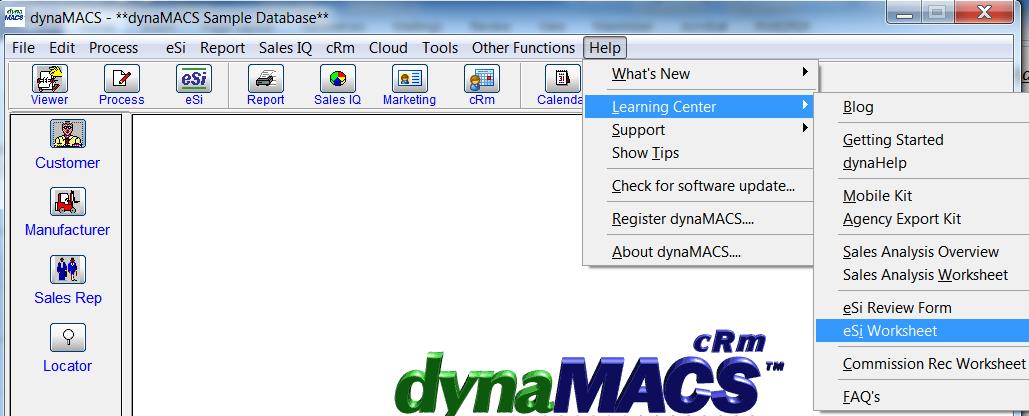
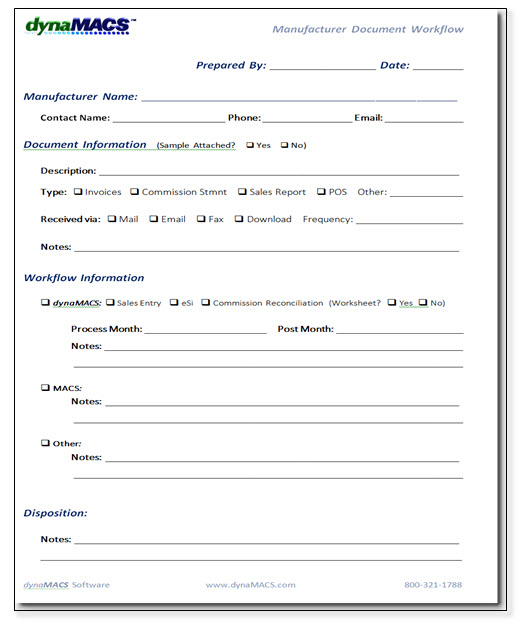
    To obtain copies of this worksheet and all other dynaMACS worksheets go to Help>Learning Center from the dynaMACS Main Screen.  You will also find them in the dynaMACS Implementation Kit that you receive upon purchasing your software.

Tip #1611 – Using Sales IQ and Google Maps to Help Plan for a Sales Manager Visit

dynaMACS Sales IQ has a unique feature that can map the customers you want to visit with Google Maps.  The example below will show you how to filter the criteria and customize which customers you visit.

Example

First we will focus on the geographic area in the state of Illinois where the sales manager from Lee Jacob wants to visit.

  1.  From the Sales IQ screen, select the Filter button.sales-iq-screen-filter
  2. In the Customer State/Region field enter “IL” and “IL” (from and through) and select “Include This Range”.
  3. Select the Apply button to create a filtered database.filter-screen
  4. You will be back at the Sales IQ screen.  Select the Manufacturers tab.
  5. Highlight and right click on the manufacturer. In this example it is Lee Jacob Mfg.
  6. Select Show Customers from the drop down menu.sales-iq-screen-show-customers
  7. A new Sales IQ Drill Down window will open displaying all of the customers that buy from this manufacturer Lee Jacob in Illinois in descending sequence of year to date sales.
  8. Highlight the customers that you wish to map.
  9. Right click and select Launch Maps from the drop down menu.sales-iq-screen-launch-maps
  10. The selected customer locations will now appear in Google Maps.  Within Google Maps you are able to select which locations to visit and you can also re-sequence the route if desire.google-maps-screen

Tip #1610 – Understanding the Symbols and Codes on a dynaMACS Sales Analysis Report

When reviewing your dynaMACS Sales Analysis reports there are two symbols to look for that will easily identify customers with first time sales as well as customers with no sales in 3+ months.  There are also codes that are displayed to help you identify Column Settings and Sub Totals that where selected for this report as well as filters that may have been used.

  1.  The Column Set displays the Column Set that was chosen when creating the report.  In the following example G1 was selected.
  2.  The Subtotals displays the Subtotals Code that was selected when creating this reportIn the following example S1 was selected.
  3. Customers that have a Less-Than (<) sign to the right of the Last Activity date are those that have no sales in 3 months or longer.
  4. Customers that have an Asterisk (*) to the right of the Last Activity date are first time buyers.report-screen-1
  5. The Filter field at the bottom left hand corner of the report will display all of the filter    selections chosen when creating this report.  In this example we have selected Mfg Code IRC thru MNC, Rep Code is JB and Cust Type A thru Z.report-screen-2

Tip #1609 – A customer may be known by different names by different manufacturers. This can create unwanted customer duplication during the sales entry process.

In business it is common that companies merge, create DBA’s or an alias.  dynaMACS has a unique feature that allows you to refer to the correct customer.  The instructions below will walk you through how to accomplish this.

Add the New Customer

Add the new customer (DBA or Alias) which will be related in dynaMACS. In this example we added customer Babson Tooling (customer code BABT00).note

  1.  Edit the original customer in dynaMACS to reflect the new customer as a reference   customer in the Related To field.  In this example the customer B & B Tooling (BBTO00) is the original customer. Babson Tooling (customer code BABT00) is the Related To customer.
  2. Change the Status for B & B Tooling to Reference Only.
  3. Select the Save/Exit button.sales-entry-screen-1

Making Sales Entries Using Related to Customers

  1. In Sales Entry, enter the old customer code for B & B Tooling (BBTO00).
  2. You will get a message as seen below displaying the Reference Customer code.  Select the OK button.sales-entry-screen-2
  3. After selecting the OK button you will see that the Customer Code changes to the newly created Reference Customer code for Babson Tooling (BABT00).

sales-entry-screen-3