Posts
Tip #1611 – Using Sales IQ and Google Maps to Help Plan for a Sales Manager Visit
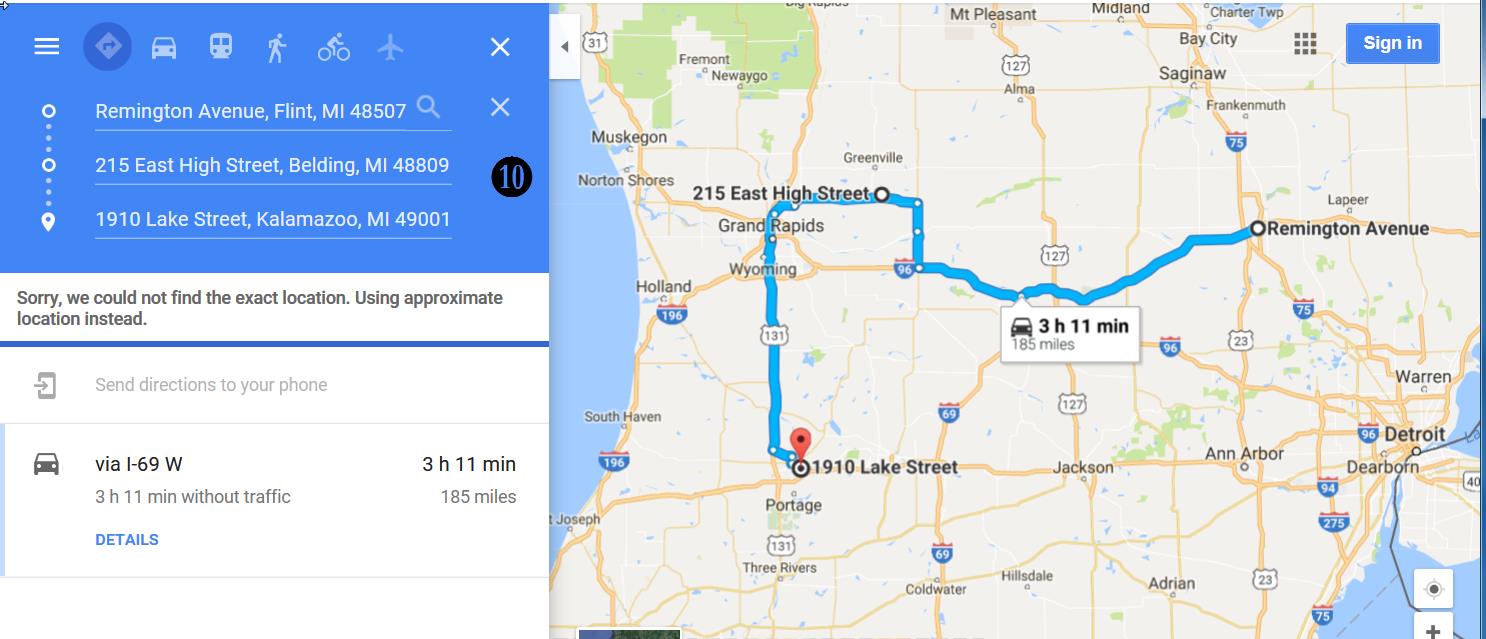
dynaMACS Sales IQ has a unique feature that can map the customers you want to visit with Google Maps. The example below will show you how to filter the criteria and customize which customers you visit.
Example
First we will focus on the geographic area in the state of Illinois where the sales manager from Lee Jacob wants to visit.
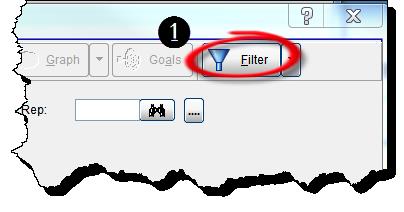
- From the Sales IQ screen, select the Filter button.
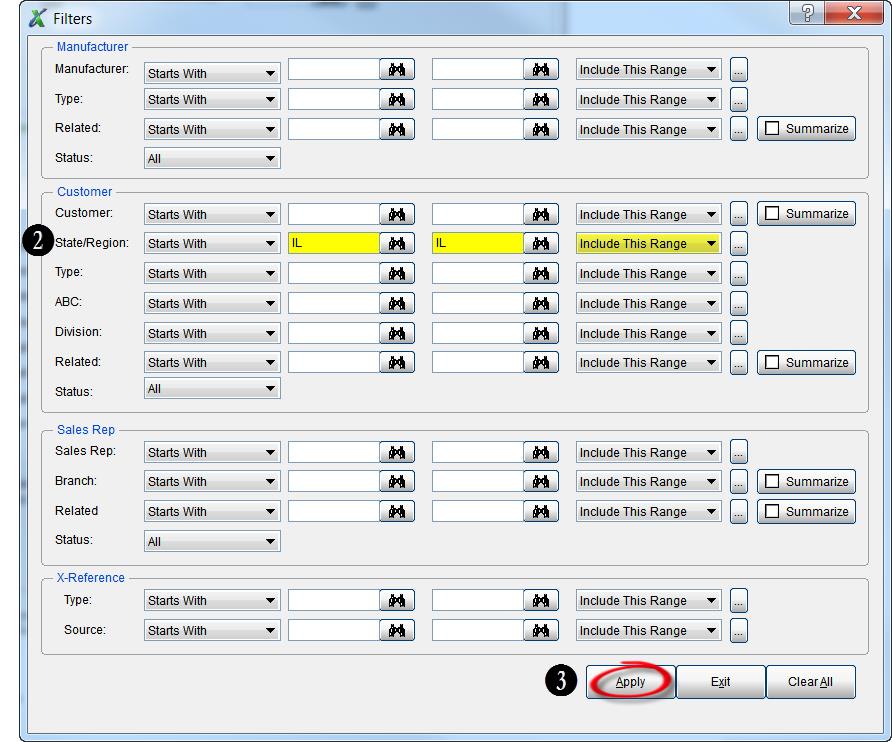
- In the Customer State/Region field enter “IL” and “IL” (from and through) and select “Include This Range”.
- Select the Apply button to create a filtered database.
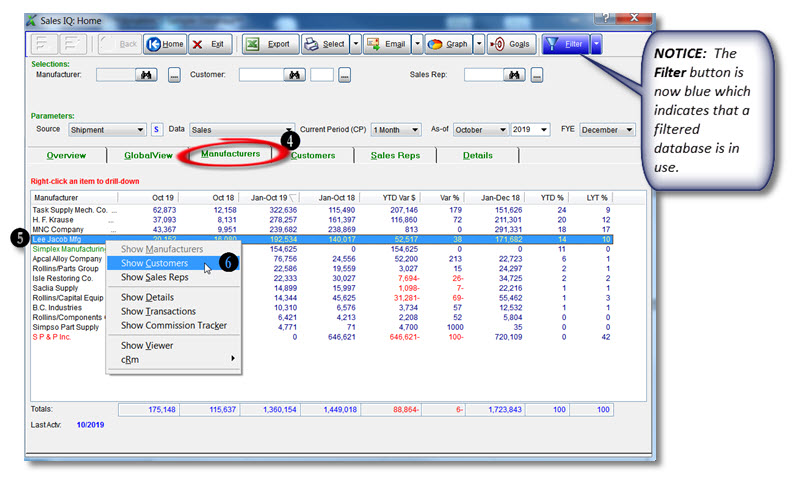
- You will be back at the Sales IQ screen. Select the Manufacturers tab.
- Highlight and right click on the manufacturer. In this example it is Lee Jacob Mfg.
- Select Show Customers from the drop down menu.
- A new Sales IQ Drill Down window will open displaying all of the customers that buy from this manufacturer Lee Jacob in Illinois in descending sequence of year to date sales.
- Highlight the customers that you wish to map.
- Right click and select Launch Maps from the drop down menu.
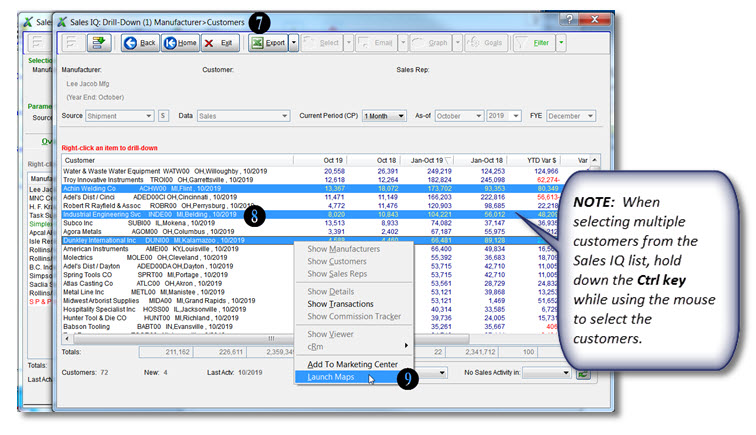
- The selected customer locations will now appear in Google Maps. Within Google Maps you are able to select which locations to visit and you can also re-sequence the route if desire.
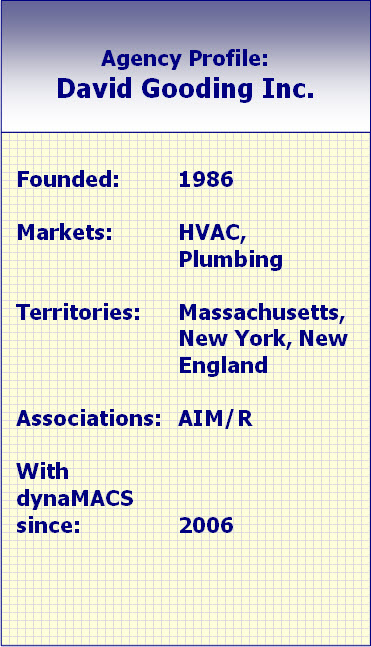
Case Study: David Gooding, Inc.
“The accessibility to data we have with dynaMACS is tremendous. It’s extremely user friendly for everyone at the agency.”
Patrick Carroll, Information Systems
David Gooding Inc.
 Client Challenge
David Gooding Inc.’s old software pulled information from a Microsoft database and applied data tables to it, based on computer code the user had to enter. If that sounds complicated, it was. The tedious process was built for programmers. Attempting to run a sales report practically required the user to have a degree in Computer Science. The sales agency was in dire need of a more user friendly software.
 dynaMACS Solution
Then David Gooding was introduced to dynaMACS. Patrick Carroll, Gooding’s Information Systems Manager, knew right away that dynaMACS had the ease-of-use the agency was looking for. “The accessibility to data that we have with dynaMACS is tremendous. It is extremely user friendly for everyone.”
“With one mouse click, you can drill down to more information from any screen,” he says. “The ability to get any information you need, instantly and easily, is a big benefit to everyone at the agency.”
Various people at the agency access dynaMACS in different ways. The owner has remote access, and the lead salesperson has dynaMACS Mobile on his laptop. Both have access to up-to-date information on manufacturers, customers and sales reps from anywhere they are – at home, on the road or at the office.
One of Carroll’s favorite features is the ability to email reports directly from dynaMACS Sales IQ. The agency can email reports instantly to manufacturers, customers and salespeople. Selecting the email button creates the email with the report attached in PDF format. dynaMACS pulls up the appropriate customer, manufacturer or sales rep which the report will be sent to – and the user never has to open Outlook – the process is automatic.
“With dynaMACS, we’re well informed about our business,” Carroll says. “During the month, we can quickly see where all manufacturers stand, what groups of product categories are being sold and much more. It’s an invaluable sales tool.”
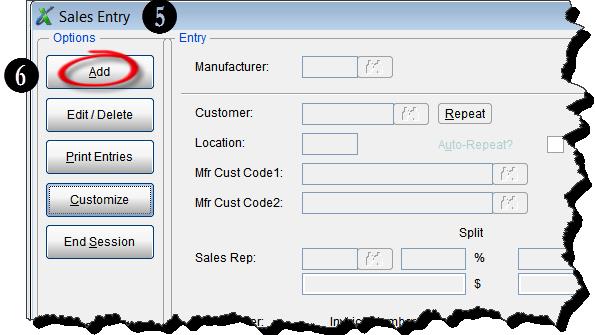
Tip #1608 – Save Time by Using the Manufacturer Customer Code During Manual Entry
When entering Sales and Commissions directly from a manufacturer’s spreadsheet or invoice, it may be quicker to enter in Sales Entry using the Manufacturer Customer Code. The following tip explains how to customize a sales entry session to accomplish this.
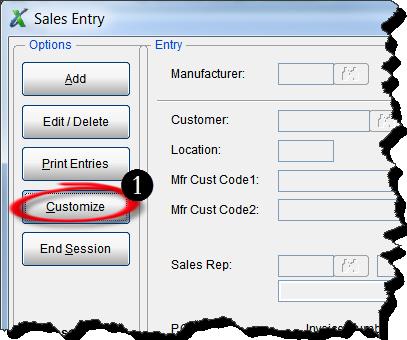
- From the Sales Entry screen select the Customize button.
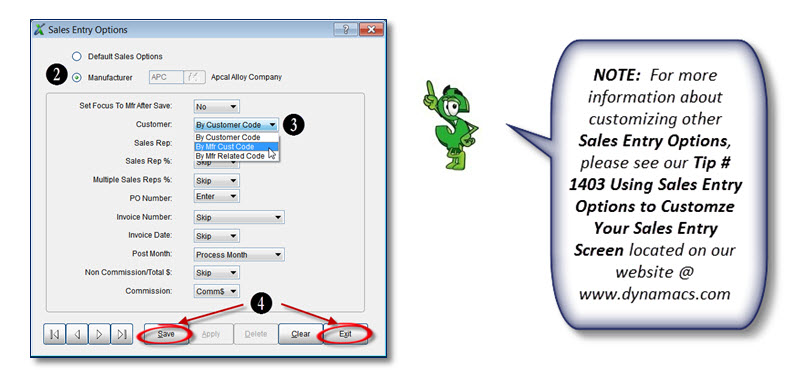
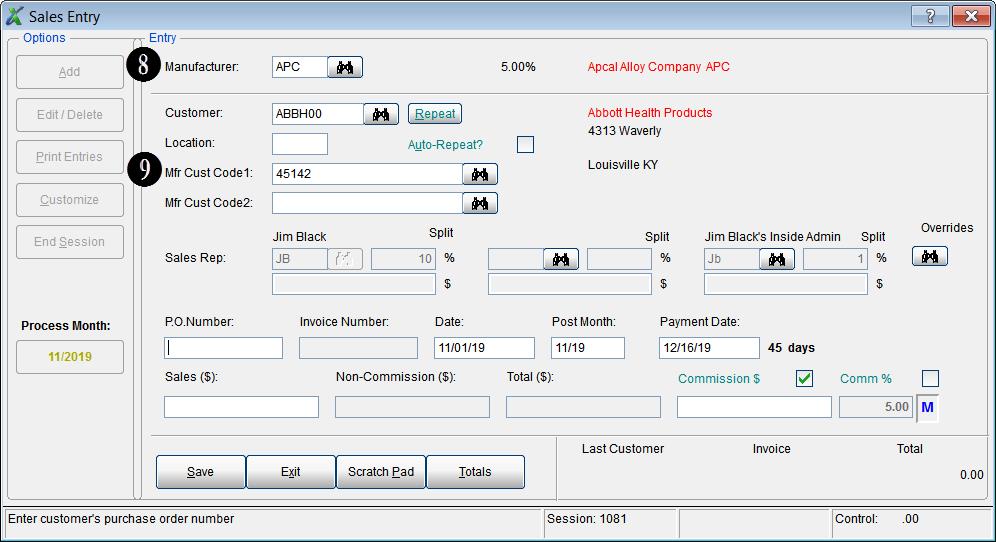
- Select the Manufacturer radio button and enter the Manufacturer Code. In this example we will use the manufacturer code APC for Apcal Alloy Company. You can click on the Binoculars button to search for the Manufacturer Code if you don’t have it.
- Select By Mfr Cust Code from the drop down in the Customer field.
- Click on the Save button and then select the Exit button.
- You will be returned to the Sales Entry screen.
- Select the Add button to begin adding your sales and commission information.
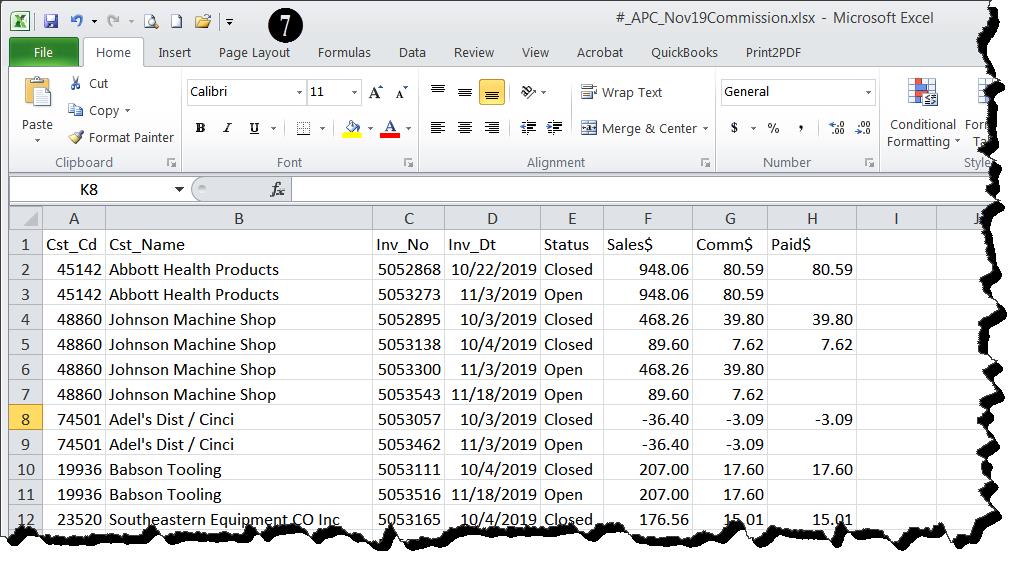
- Below is a sample of a manufacturer spreadsheet from the manufacturer Apcal Alloy Company which shows the manufacturer customer codes along with the sales and commission information.
- Enter the Manufacturer code in the Sales Entry screen and select <Enter>. (In this example it’s APC for Apcal Alloy Company)
- You will notice that the cursor then jumps directly to the Mfg Cust Code 1 field where you can enter the manufacturer customer code from the spreadsheet or invoice. You can also click on the Binoculars button to search for the Manufacturer Customer Code if you don’t have it. From here you can continue on with your sales entry as normal.
Tip #1607 – Transferring Sales and Commissions History for a Specific Manufacturer and Customer to a Different Sales Rep
In our previous Tip #1606 we discussed how to automatically give a sales rep that is not currently assigned to a particular customer, credit for sales based upon the manufacturer. This tip is a follow up which discusses how to transfer the sales and commission history for the manufacturer/customer after making that override.
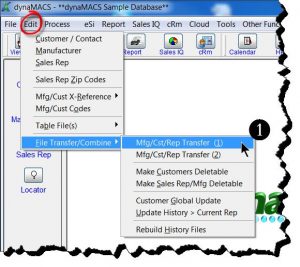
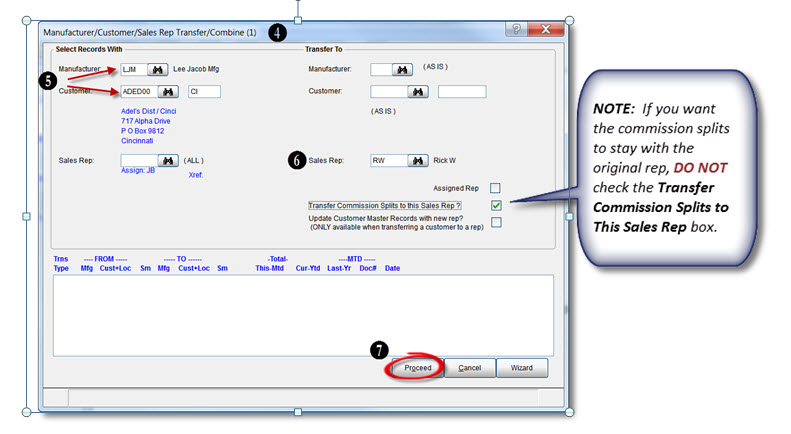
- From the main dynaMACS screen select Edit>File Transfer/Combine>Mfg/Cst/Rep Transfer (1).
- If you are prompted to Create Restore Point always answer “Yes” and enter a good Description for your restore point. In this case we will enter “Moving History from JB to RW”.
- Select the Proceed button.

- When the Create Restore Point is complete the Manufacturer/Customer/Sales Rep Transfer/Combine (1) screen is displayed.
- On the left side (under Select Records With) enter the Manufacturer code and then the Customer code.
- On the right side (under Transfer To) enter the new Sales Rep code and check the Transfer Commission Splits to this Sales Rep box if you want to transfer the splits to the new rep. (See Note below)
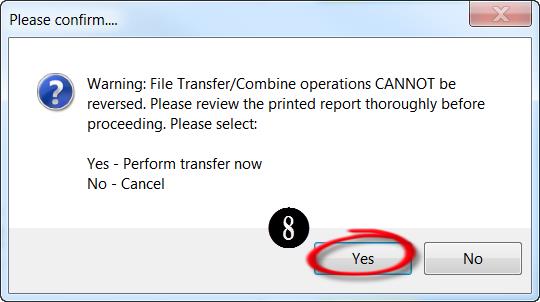
- Select the Proceed button and then select Yes at confirmation to print your Audit Report. Be sure to choose print to PDF as the file may be quite large.
- At the Please Confirm dialog box select the Yes button if everything is correct on the Audit Report to continue with the transfer.
- Select the OK button from the F.Y.I. dialog box.
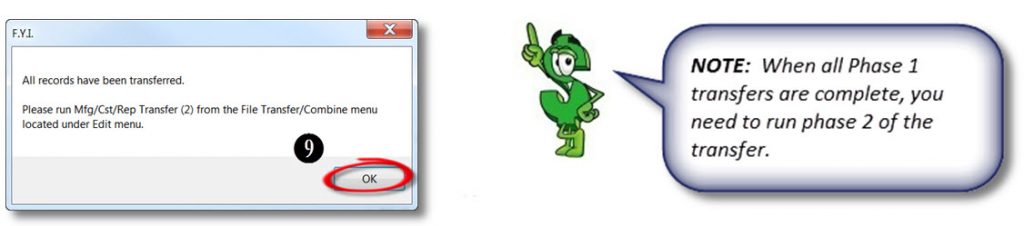 Repeat steps 4 through 9 for as many transfers as needed.