Posts

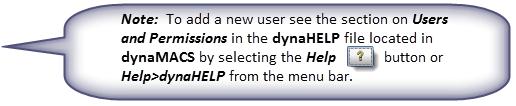
Tip #1202 – Understanding Security Features in dynaMACS

As in other businesses, many agencies may want to restrict access to certain confidential information stored in dynaMACS. For example, it may be necessary to restrict commission information from being seen by the general user community and only visible to management and the sales rep. In dynaMACS we have made it simple to set up your user security.

Security in dynaMACS is controlled through predefined security classes. You can assign one or more classes to each user ID. Each class has a unique function and controls access to certain screens or programs in the system. System Administrators should become familiar with each class before creating new users in the system.

The User/Class Maintenance screen is also used to reset a user password should they forget their password.

The following information and tips will help you understand how to best utilize the User/Class Maintenance.

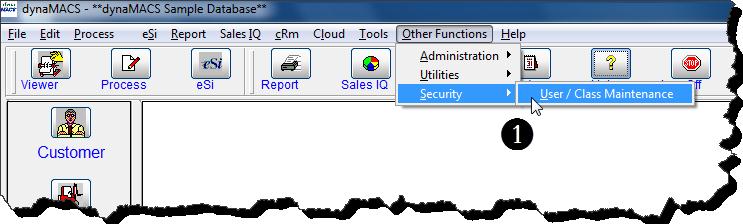
Accessing the User/Class Maintenance Screen

  1. From the dynaMACS main screen select Other Functions>Security>User/Class Maintenance.dynaMACS Main Screen
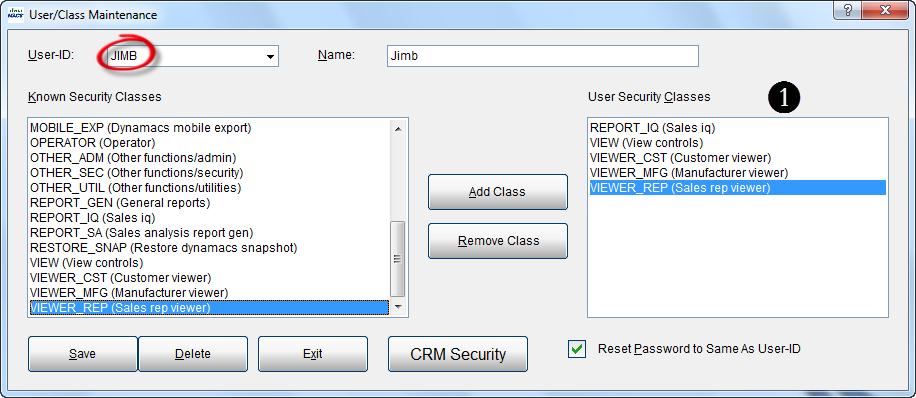
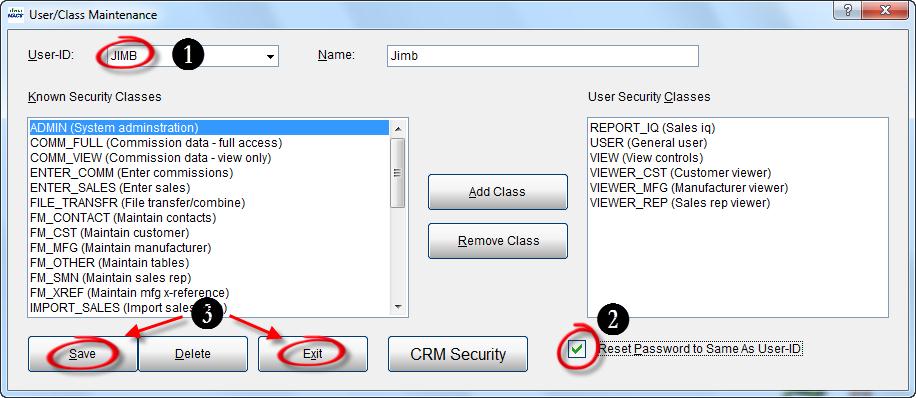
  2. The following displays the User/Class Maintenance screen.User Class MaintNote

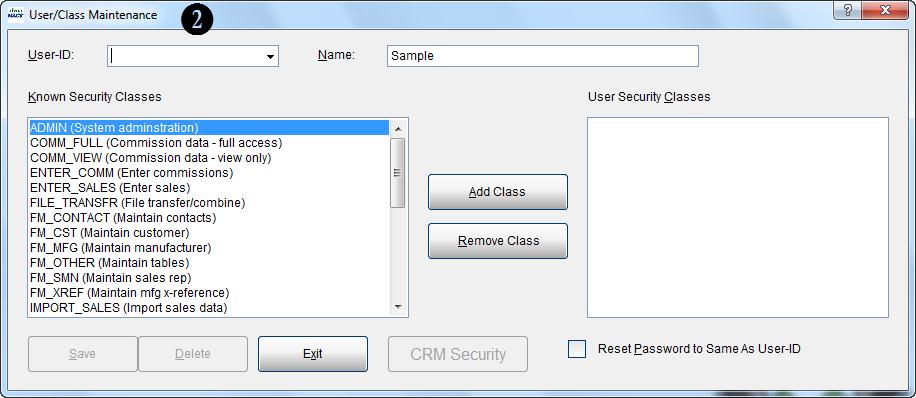
Once you have selected a User ID from the drop down list you can then add a security class by highlighting it in the Known Security Classes list and selecting the Add Class button, OR you can remove a security class by highlighting it in the User Security Classes list and selecting the Remove Class button.

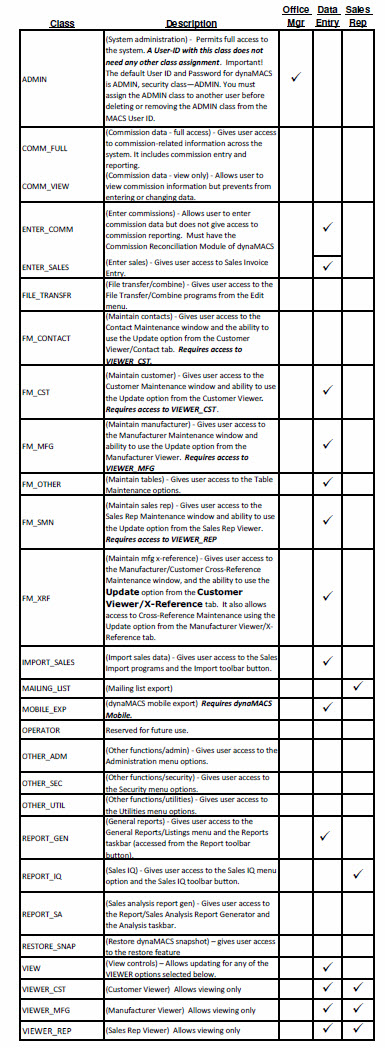
List of Security Classes

Below is a reference list of Security Classes available in dynaMACS. The user class ADMIN allows FULL rights to all functions listed below. The chart below suggests the classes that you may want to assign to Office Manager, Data Entry users and Sales Reps.

Security_Classes

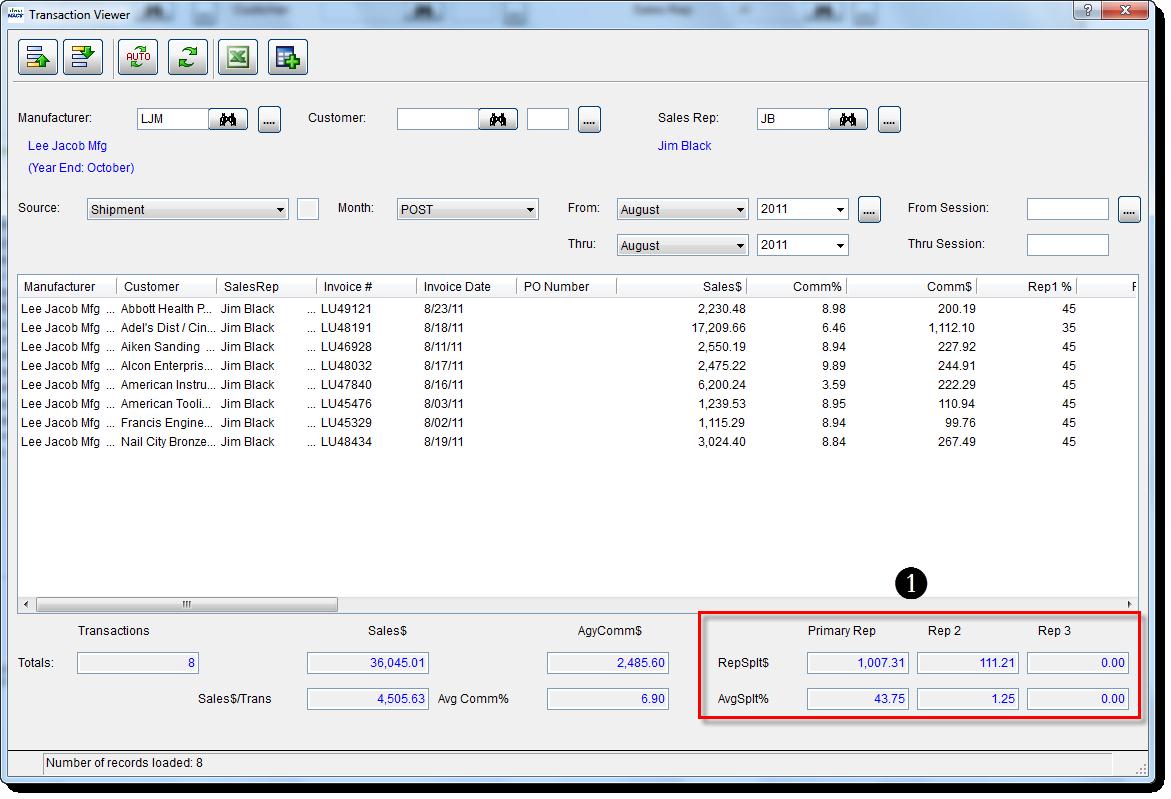
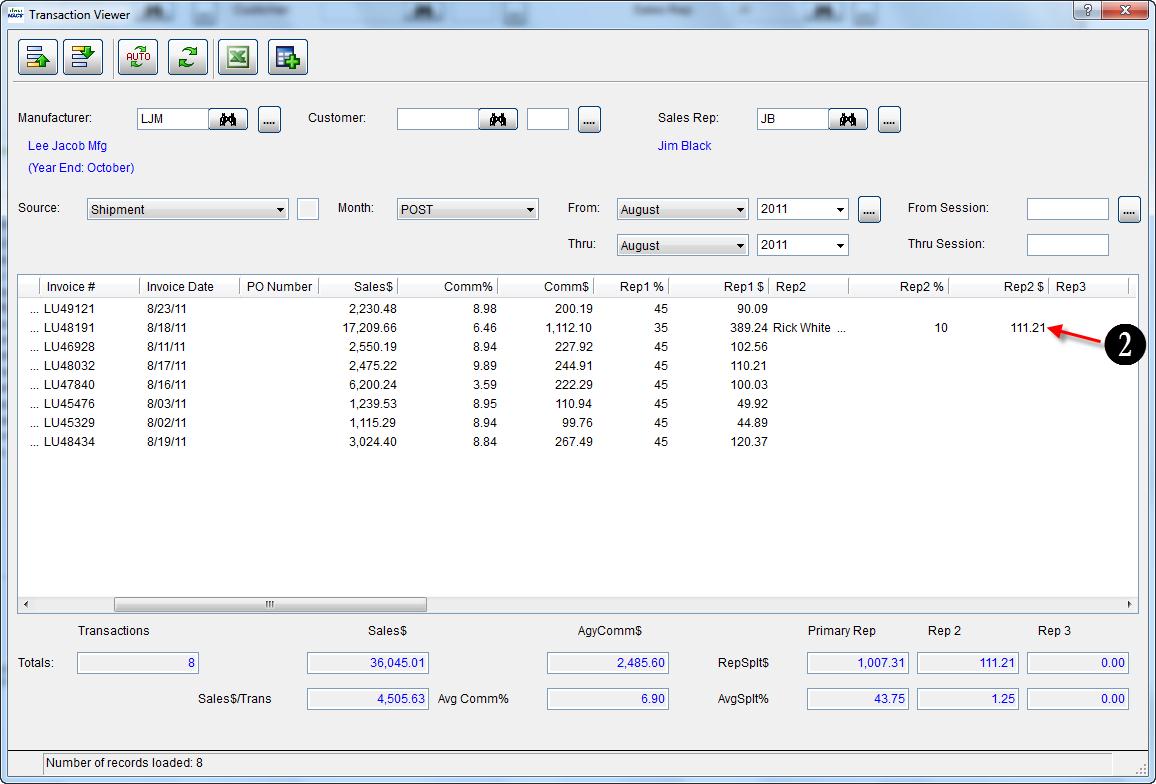
Restricting Access to Certain Information

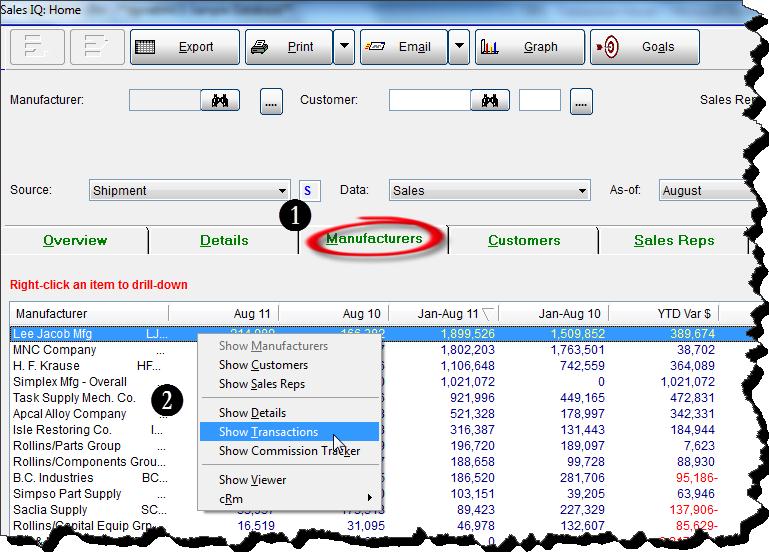
By selecting specific User Security Class codes you can restrict access to different functions and views within dynaMACS.

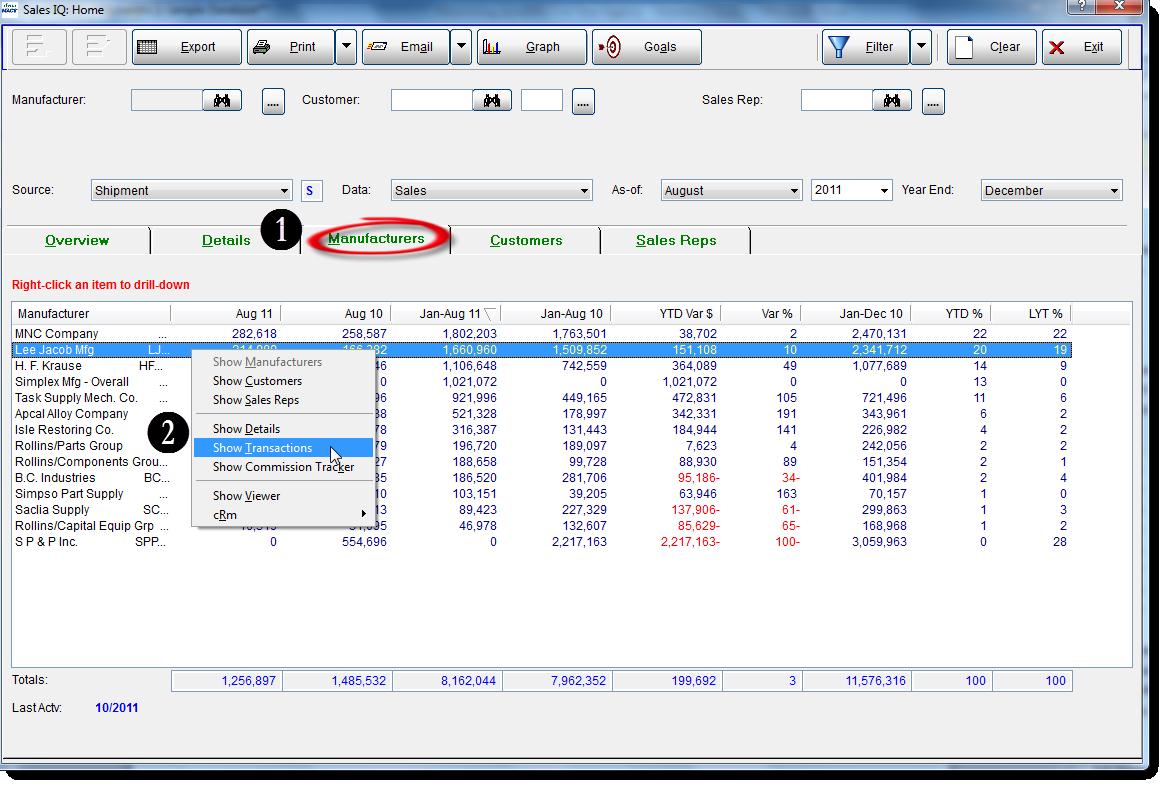
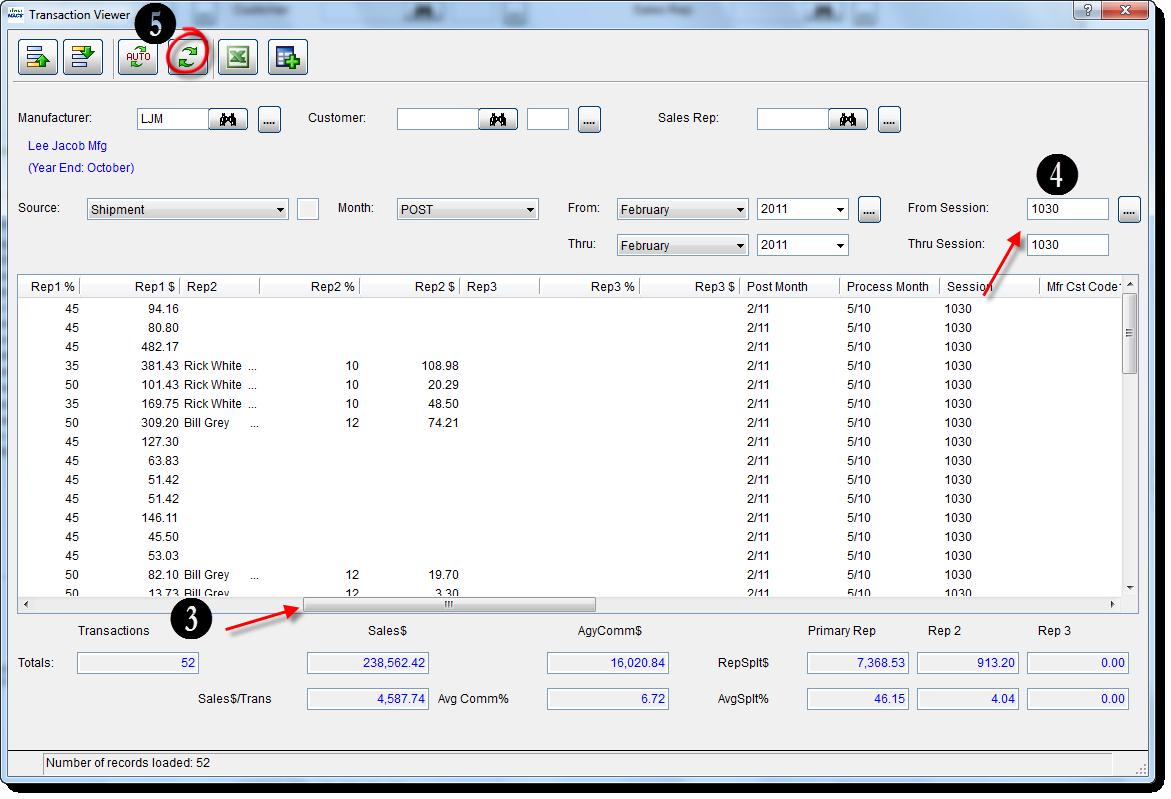
    • The following example shows a sales rep (JIMB) with the following User Security Class codes assigned:
      • VIEW (View Controls) Required for update capabilities in Customer, Manufacturer and Sales Rep Viewer.
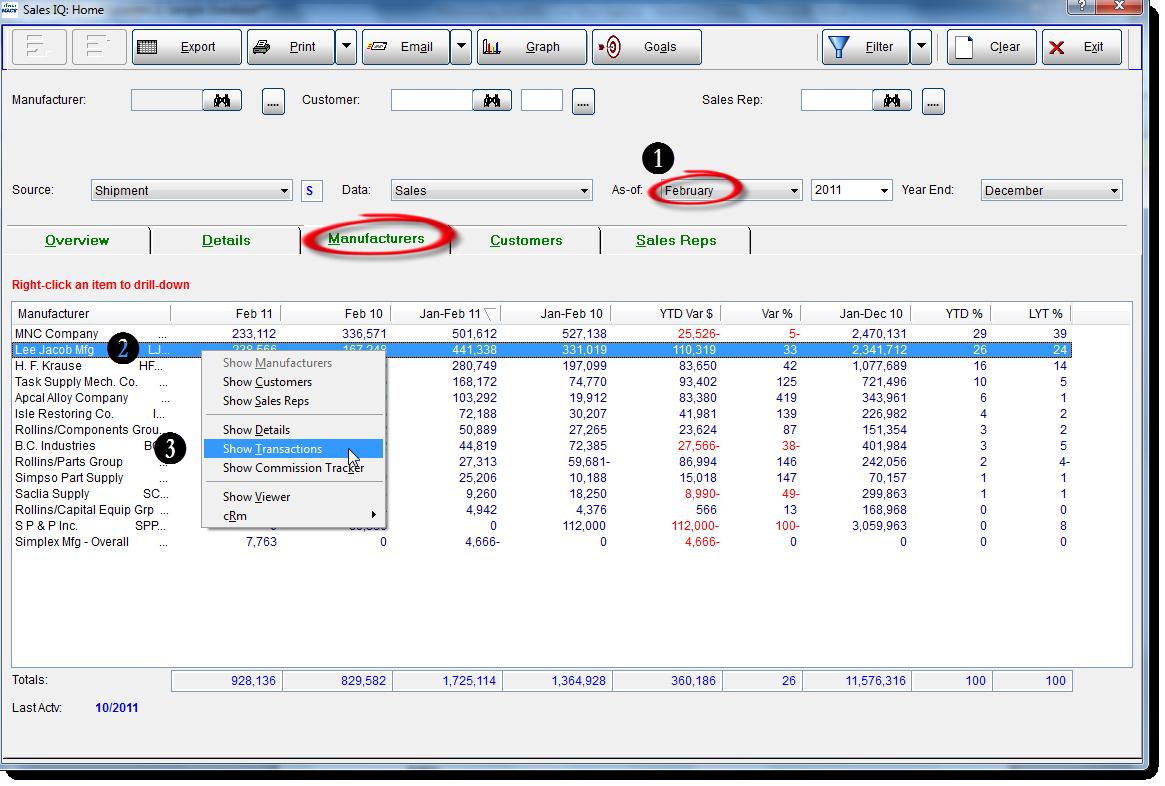
      • REPORT_IQ (Sales IQ)
      • VIEWER_CUST (Customer Viewer)
      • VIEWER_MFG (Manufacturer Viewer)
      • VIEWER_REP (Sales Rep Viewer)

      User Class Maint 2

      Note 2

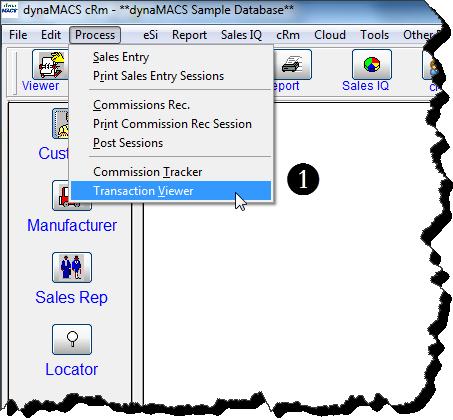
    • Below is the menu and toolbar on the main dynaMACS screen logged in as JIMB. As you can see, there are features that are NOT accessible to JIMB. These are the menu items and icons that are not activated or “grayed out”.
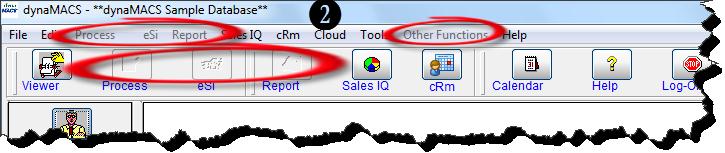
dynaMACS Main Screen 2

By referring to the list of Security Classes in the previous section, you can determine the level of security that best fits each user.

Resetting a User Password

You can reset the user’s password to the same as their Login ID which will prompt the user to then create a new password the next time they login.

    1. From the User/Class Maintenance screen, bring up the User ID that needs to be reset.
    2. Check the Reset Password to Same As User-ID box.
    3. Select the Save button and then the Exit button.User Class Maint 3
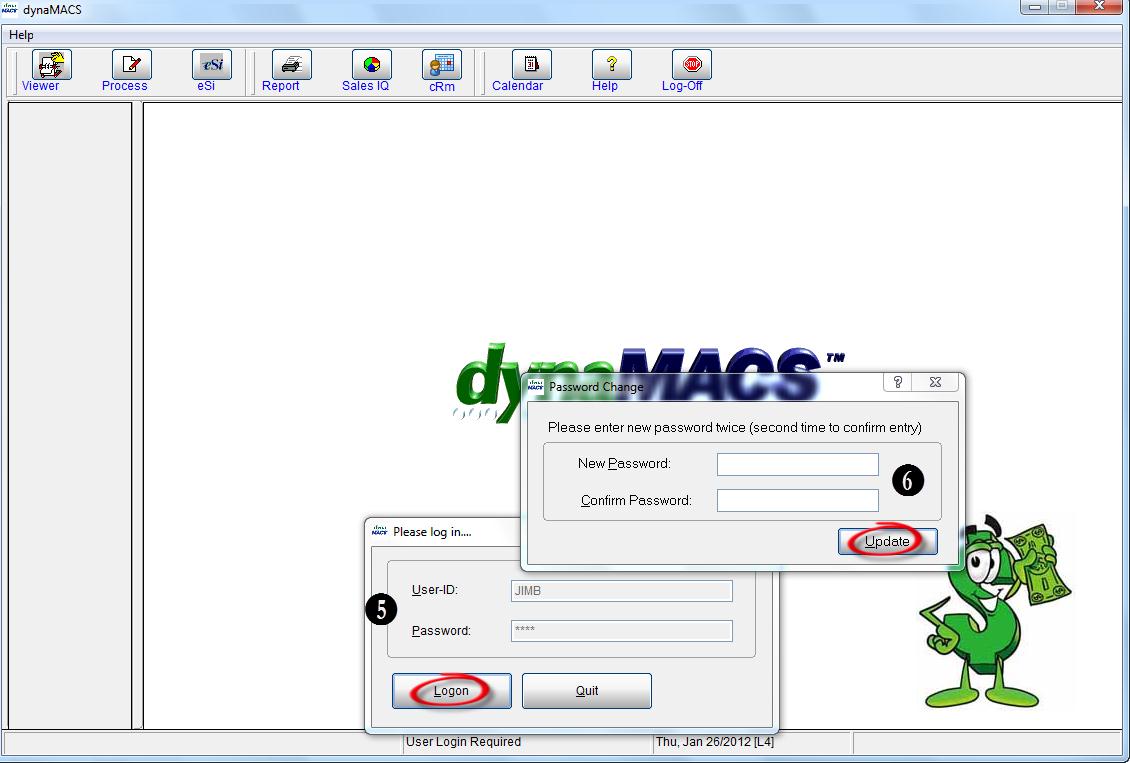
    4. Upon logging into dynaMACS again the user would enter the User ID and current Password.
    5. When prompted, the user enters the New Password and then Confirms Password in the Password Change dialog box.dynaMACS Main Screen 3

Case Study: RST Thermal

“dynaMACS is a great fit for our agency. It is very user friendly and provides all the information we need, quickly and easily.”

Mary Ellen Hickey, Operations Officer & Support
RST Thermal

RST_Thermal_LogoClient Challenge

As Operations Officer for RST Thermal, Mary Ellen Hickey knew the previous software they had been using for sales and commission tracking was not enabling the agency to operate at maximum efficiency. “The software simply wasn’t providing the level of information we needed,” she says. “We wanted to track wholesalers and see sales broken out by branches, but we weren’t able to do that. In addition, it was difficult to use. We were looking for something much more user friendly.”


RST_Thermal_StatisticsdynaMACS Solution

RST Thermal began researching other software options, and when they found dynaMACS, they knew they had a winner. “dynaMACS is a great fit for our agency. It is very user friendly and provides all the information we need, quickly and easily,” Hickey says.

Since switching to dynaMACS, RST Thermal is seeing data in ways they never could before. Now RST Thermal can easily:

* See sales and commissions by branch, manufacturer, customer or sales rep.

* Compare year-to-year sales, or see any previous point in time.

* Drill down for more detailed information from any screen.

* Split commissions and change commission rates for different customers and/or manufacturers.

* Post invoices to the month in which the sale occurred – rather than when the agency received the information.

Eliminate data entry, by using eSi to import manufacturers’ commission reports electronically.

“With eSi, we receive the information on the same day that the factory sends it – no waiting for invoices to arrive in the mail.” The agency can process the file immediately, so its database it much more up-to-date.

With dynaMACS, RST Thermal has software that enhances efficiency, rather than prohibits it.

Case Study: Hammond Group

“For the first time ever, our sales reps receive up-to-date sales reports – and believe in the accuracy of the numbers. They are equipped to be more proactive and productive.”

Barbara Hammond
Hammond Group

Hammond_Group_ImageClient Challenge

Until a year ago, The Hammond Group used CAS-rep as its software, and the agency always behind in reporting sales and commission figures. Why? The entire process, from data entry and viewing reports, to customizing sales rep reports and sending them via mail, was a manual and very cumbersome process. “Essentially, it was a useless tool,” Hammond recalls.


Hammond_Group_StatisticsdynaMACS Solution

When dynaMACS was implemented (a process Hammond recalls took just a few hours: “dynaMACS converted our files, and we literally flipped the switch with no problems.”) the manual nightmare became an automated dream. Data entry, reporting and distribution became nearly effortless:

Using dynaMACS’ eSi, The Hammond Group receives sales and commission statements electronically from six of its largest factories – virtually eliminating data entry. With a few clicks of the mouse, files are transferred and the agency’s database is updated. Rather than wasting time on data entry, the staff is adding value to the agency.

Even for those factories still sending paper invoices, statements are entered as soon as they are received, resulting in always up-to-date sales figures.

And, dynaMACS Mobile eliminated mailing long, printed reports to the field. Sales reps receive their sales reports electronically. Even when traveling or at home, they simply log on to email and download the most recent figures – an amazing advantage when preparing for customer meetings.

Additionally, dynaMACS has enabled The Hammond Group to collect commissions on past due orders, send updated information any time a sales rep requests it and be more proactive in sales strategies and customer service.

Tip #1201 – Using dynaMACS Transaction Viewer

The Transaction Viewer is a powerful tool accessible through Sales IQ or the Process Menu. Through the use of the Transaction Viewer you can review all transactions posted in dynaMACS for manufacturers, customers and sales reps by:

  • Source (i.e. Shipment or Commission record)
  • Month (i.e. Post or Process Month)
  • From and Thru Date
  • From and Thru Session

The following tips will help you understand how to best utilize the Transaction Viewer.

Accessing the Transaction Viewer

From Sales IQ . . .

  1. In the Sales IQ screen select the Manufacturer, Customer or Sales Rep tab.
  2. Select a manufacturer, customer or sales rep right click and choose Show Transactions.Sales IQ Home 1

From the Process Menu . . .

Coming from the Process menu will bring up a blank transaction viewer screen vs. coming from a Sales IQ where a manufacturer, customer or sales rep is already selected.

  1. From the main dynaMACS screen select Process and then Transaction Viewer from the menu.Main Screen

From the Transaction Viewer, you can review the detailed transactions that make up the sales and commission numbers.

In the following example we will look at sales numbers for the manufacturer Lee Jacob Mfg.

  1. From the Sales IQ Manufacturers tab, select the Month.
  2. Select Lee Jacob Mfg.
  3. Right click and select Show Transactions.Sales IQ Home 2
  4. From this vantage point we are able to review the transaction details to determine where entry errors may have occurred and corrections may need to be done.Transaction Viewer 1

Transaction Viewer 2

Note

Reversing and Correcting Sessions in Transaction Viewer

In order to correct the posting of a session in the wrong month, a reversal session is required and then a repost in the correct month. The following is an example of how to proceed with this.

  1. From the Sales IQ Manufacturers tab, select the Month.
  2. Right click the manufacturer and select Show Transactions.Sales IQ Home 4
  3. In the Transaction Viewer move the bottom scroll bar to the right until the Session Numbers are visible.
  4. If there is more than one session listed in the Transaction Viewer screen, enter the session number to be reversed in the From Session and To Session fields.
  5. Select the Refresh Button to refresh the screen showing only the one session.Transaction Viewer 3
  6. Select the Create Session button. Transaction Viewer 4
  7. At the “Do you wish to reverse the amount signs?” prompt select Yes.Confirmation Dialog Box 1
  8. At the “Sessions have been created. Please print and verify before posting it” prompt select OK.Confirmation Dialog Box 2
  9. Select the Create Session button again.Transaction Viewer 5
  10. At the “Do you wish to reverse the amount signs?” prompt select No.Confirmation Dialog Box 3
  11. At the “Sessions have been created.  Please print and verify before posting it” prompt select OKConfirmation Dialog Box 4
  12. Close out of Transaction Viewer and Sales IQ and then go to the Sales Entry screen.
  13. You will see the two newly created sessions each with a description of “From Tran. Viewer”. One will have a negative value and the other a positive value. Highlight the second session with the positive value.
  14. Select the Edit button.Sales Entry Session Info 1
  15. In the Sales Entry screen select the Customize button.Sales Entry
  16. Make sure that the Post Month field is set to Process Month (PrMth).  If it is not, tab to the Post Month field and change it by using the <F2> key and selecting the Apply button.Customize Sales Entry
  17. Back at the Sales Entry screen select the yellow Process Month button.Sales Entry 2
  18. At the Warning… screen select the Yes button.Warning Dialog Box
  19. Change the Process Month to the desired date and select the OK button.Change Process Month
  20. Exit from Sales Entry
  21. Go to File>Take SnapshotTake Snapshot
  22. Go back to the Sales Entry screen, choose both sessions by selecting the first session, hold down the <Ctrl> key and then select the second session.
  23. Select the Post button.Sales Entry Session Info 2
  24. Verify in Sales IQ that all figures for this month are now correct.

Searching for a Specific Invoice in Transaction Viewer

From the Transaction Viewer you can find invoices by sorting on the Invoice # field. In the following example we will look for invoice# LU46265 for the manufacturer Lee Jacob Mfg.

  1. From the Sales IQ screen select the Manufacturers tab.
  2. Select Lee Jacob Mfg, right click and then select Show Transactions to get to the Transaction Viewer screen.Sales IQ Home 1
  3. From the Transaction Viewer, click on the Invoice# column heading.Transaction Viewer 6
  4. You will notice that the Invoice# column has now been sorted in ascending order so that you can scroll down to the invoice that you are looking for. Likewise, it can then be sorted in descending order by clicking again on the Invoice# column heading.Transaction Viewer 7

Checking Sales Rep Split Commissions in Transaction Viewer

From the Transaction Viewer you can see commission splits for a manufacturer, customer or sales rep.

  1. In the following example for manufacturer Lee Jacob Mfg we can see that there is a rep split by looking at the bottom right hand corner of the Transaction Viewer screen. The Rep Split$ and Avg Split% is displayed for the Primary Rep and Rep 2.Transaction Viewer 8
  2. Using the scroll bar at the bottom of the screen scroll over to the right and the details of the split are displayed. In this example Jim Black is the primary rep (or Rep1) and is being paid 35% of the Comm$Rep 2 is Rick White and he is receiving 10% of the Comm$.Transaction Viewer 9Note 2