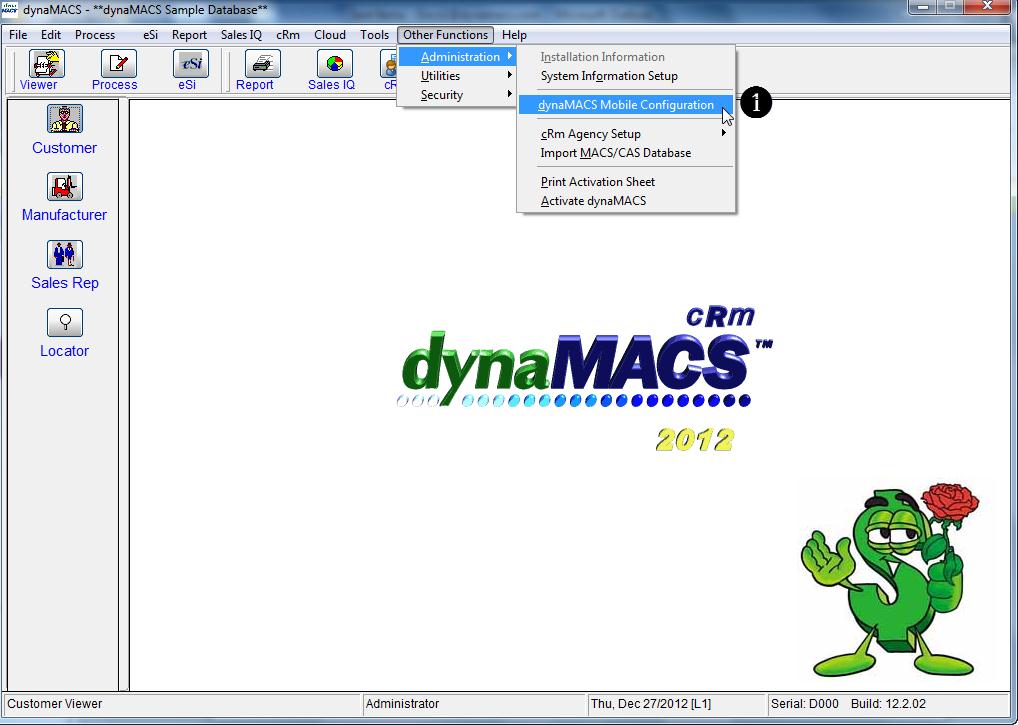
Tip #1301 – Power of eSi Mapping

If you receive sales information from manufacturers electronically, you can replace hours of data entry by importing that information directly into dynaMACS using the optional Electronic Sales Input (eSi) module. eSi includes the Reformat Utility which translates the information from your manufacturer into a file that dynaMACS recognizes. Once you have shown dynaMACS how to translate a manufacturer’s file the first time, dynaMACS remembers the translation, or map, for any future sales information files received from that manufacturer. Below are just a couple of eSi features that show the power of eSi mapping.

Auto Duplicate Feature

The Advanced feature #11 says Auto Duplicate any fields in the import file if the row is blank. This will apply to all dynaMACS fields in Column 3 that have an “*” next to them.

Electronic Sales Information Mapping with the auto duplication field checked for importing manufacturer commission statements into dynaMACS Software

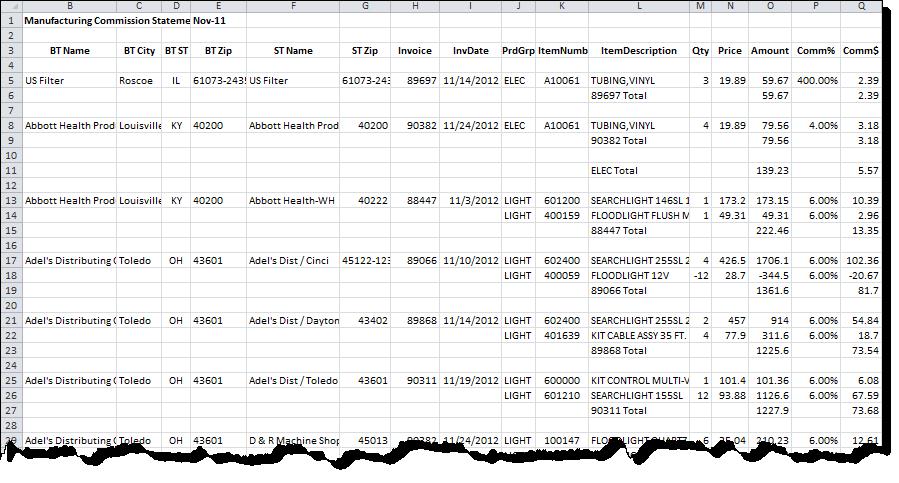
The spreadsheet example shown below is a primary example of where this can be used. Notice the first entry for each invoice has the permanent information but each subsequent row is left blank. By selecting the Auto Field Duplication option, the blank fields will be populated with the preceding data. This eliminates the need to manually modify the spreadsheet prior to processing it in dynaMACS.


Append Feature

With the Append feature you can combine two fields from your import file to map to a dynaMACS field. This is useful in identifying multiple Ship-to locations for a customer where the Ship-to location is in a different field from the Sold-to customer code. In the following example we will append the Code field with the Zip Code field.

  1. First highlight a field in box (2) Selected.
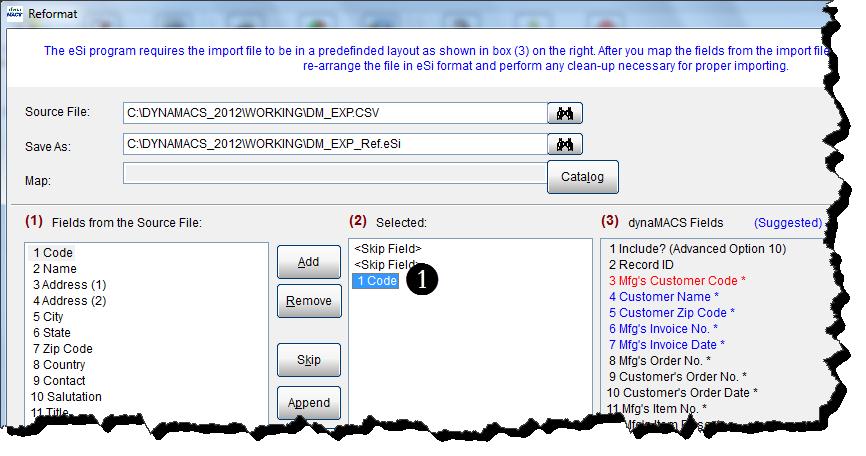
  2. Next highlight a field in box (1) Fields from the source file which will be appended to the field selected in step 1 and select the Append button.
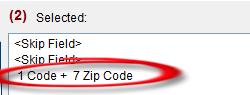
  3. The field Code is now appended with the field Zip Code. The combined field is “mapped” to the Mfg’s Customer Code used to identify the correct customer.Electronic Sales Information Mapping with the results of appending 2 fields together for the importing manufacturer commission statements into dynaMACS Software

If you are interested in the dynaMACS eSi module and you currently do not have access to it, please contact the dynaMACS sales office @ 800-321-1788 to learn more.

Tip #1212 – Using Dropbox simplifies the process of sending and receiving dynaMACS Mobile update files

Dropbox helps you store files and access them any time wherever you are. Using Dropbox with dynaMACS will eliminate the need for sending and receiving your dynaMACS files via email. Dropbox creates a special folder on all your devices. Any time you need to save a file, drag it into the folder and at a blink of an eye it will appear in the same folder on all the other devices, be it laptops, PCs, mobile phones or tablets. For more information on obtaining a Dropbox account visit their website at www.dropbox.com.

Note

Setting up the dynaMACS Mobile Configuration for Dropbox Access

To save dynaMACS Mobile files to Dropbox you must set up each dynaMACS Mobile user configuration to save these files to a Dropbox folder.

  1. From the main dynaMACS screen select Other Functions>Administration>dynaMACS Mobile Configuration to open the dynaMACS Mobile Configuration screen.dynaMACS Main Screen
  2. With the configuration selected for the mobile user, select Copy Exported file To This Folder from the drop down box in Send/Copy Options
  3. Enter the path on your computer for the Dropbox Bin
  4. Select the Save button then the Exitbutton.Mobile Config

Accessing Agency Files from Dropbox

Since your agency file is sitting in a Dropbox folder, there is no longer a need to receive it via email and copy it to a folder on your computer before importing. You can go directly to the Dropbox folder during the Import Agency File process.

  1. From the Import Agency File screen select the Binoculars button to locate the agency (.DMF) file in the Dropbox folder and proceed with the import.Import Agency File


Tip #1211 – Using Data Field in Sales IQ to help analyze sales and commissions. . .

dynaMACS Sales IQ has a unique way of analyzing sales and commissions which allows you to change the data that is displayed in Sales IQ in order to view it several different ways. This tip will show you how to use this data field and also what data fields are displayed for each Data Type option.

Using the Data Type Field

In the following example we show data for Sales and RepSplits listed by sales rep as of October 2012. This allows you to examine sales by each sales rep and what commissions have been paid to each sales rep.

  1. From the dynaMACS main screen, select the Sales IQ button.
  2. Select Sales + RepSplits from the Data drop box list.
  3. Select October from the As-of drop box list.
  4. Select the Sales Reps tab.
  5. >The columns in blue represent sales numbers for each sales rep.
  6. The columns in green represent commissions paid for each sales rep.SIQ Home

Data Type Descriptions

The following chart explains each Data type available and what will be displayed on the Sales IQ screen when selected.

Data_Spreadsheet

Tip # 1210 – Using dynaMACS to Print Labels Directly to Microsoft Word

The dynaMACS Mailing List Export is a simple feature that allows you to print your mailing labels directly to Microsoft Word. This feature lets you target specific customers by filtering on data fields from the customer records in dynaMACS. You can also include or exclude customers that purchase from certain manufacturers.
The label option that will be used in the dynaMACS List Export feature must be set up first in your Microsoft Word program in order to use the dynaMACS Print Labels option. The following example explains how to set up the label options Microsoft Word.

Setting up Labels in Microsoft Word

In the following example we will set up the 5160DM in Microsoft Word. The 5160DM is equivalent in dimensions to the Avery 5160 label.

Note: There are 3 other custom labels available in dynaMACS:

          • CustomDM1
          • CustomDM2
          • CustomDM3

These labels can be created using the same procedures and applying the appropriate dimensions for the desired label.

Example

  1. With a new document open in Microsoft Word, select the Mailings tab.
  2. Select the Labels button.Main Screen
  3. Select the Options button from the Envelopes and Labels dialog box.Envelopes and Labels
  4. From the Label Options dialog box select the option Avery US Letter from the Label Vendors drop down box.
  5. Select 5160 Easy Peel Address Labels from the Product Number list.
  6. Select the New Label button.Label Options
  7. Change the Label Name to 5160DM in the Label Details dialog box. You will notice that the dimensions for the Avery 5160 are displayed. This will allow you to create a new label using the same dimensions as the Avery 5160.
  8. Select the OK button.Label Details
  9. From the Label Options dialog box select the OK button.  Note: You will see that the newly created label now appears in the list of Product NumbersLabel Options 2
  10. Select the Cancel button from the Envelopes and Labels dialog box to complete the label setup and exit the Envelopes and Labels screen.Envelopes and Labels 2

Creating Labels from the Mailing List Export Screen

The following example explains how to select the mailing list options in dynaMACS and print labels once the label has been added in Microsoft Word.

In the following example we will print labels using the label 5160DM for all customers in the state of OH and exclude the manufacturer Lee Jacob Mfg.

Example

  1. From the dynaMACS main screen select Tools>Mailing List ExportMain Screen 2
  2. In the Mailing List Export screen enter OH in the State field.
  3. Enter LJM in the From and Through fields in the Manufacturer Section.
  4. Select 5160DM from the Print Labels drop down box.
  5. Select the Proceed button.Mailing List Export
  6. The following dialog box will appear as the labels are being created in Microsoft Word.Creating Labels in MS Word Dialog BoxNote
    Error Msg - CustomDM1 Not Set Up
  7. Microsoft Word will launch with the labels displayed and ready for print.Screen Shot of Labels

Tip #1209 – Locating a Dealer/Manufacturer by ZipCode

As a sales agency you may get a request from an “end user” to locate a customer in a specific area.  dynaMACS has the capability to quickly look up a customers for a manufacturer by zip code and then further identify the best customer in that area based on sales volume.

To Locate a Dealer by Zip Code:

  1. From the main dynaMACS screen select the Locator button.
  2. Enter the Manufacturer Code in the Manufacturer field.
  3. Enter the Zip Code in the Zip Code field.
  4. Select the Locate button.Locator
  5. The Customer Viewer screen will appear displaying all customers starting with the zip code entered in the Locator search screen.
  6. Select a customer from the list, right click and select Open Sales IQ.Customer Viewer
  7. The Sales IQ screen will be displayed for the selected customer.Sales IQ Home
  8. From the Sales IQ  screen you can use the Up Arrow and the Down Arrow buttons to go from one customer to the next to review the sales volume and identify the best possible customer for the zip code area.Customer Viewer & Sales IQ

Tip #1208 – Checking for Software Upgrades

Keeping up with the latest version of dynaMACS software will provide all users with the latest changes in dynaMACS functionality. We continually listen to your feedback in order to make dynaMACS a more user friendly tool and to add or improve features that will help you and your agency become more successful. It is recommended that you periodically check for software updates.

To Check for dynaMACS Software Updates

    1. From the dynaMACS main screen select Help>Check for software update…Help_Check_Update
    2. From the True Update Welcome dialog box select the Next button.True_Update_WelcomeNote - Operation Failed

      Operation Failed

    3. If the following Already Updated dialog box appears, this indicates that you are already on the most recent version of dynaMACS. Select the Close button and restart dynaMACS.True Update 2
    4. If the Update Available dialog box appears indicating that there is a newer version of dynaMACS than the one installed on your system, select the Next button.True_Update_Windows
    5. The Updating Software dialog box will appear displaying the status of the download process. This may take several minutes.Updating_Software

When the download completes the dynaMACS installation process will start. Please follow the prompts and instructions until the installation of the update is complete.