Tip #1307 – Analyzing Top and Bottom Performing Accounts

The Sales Analysis Report Generator is a powerful feature of dynaMACS that provides you with virtually limitless possibilities for generating vital sales and commission reports.

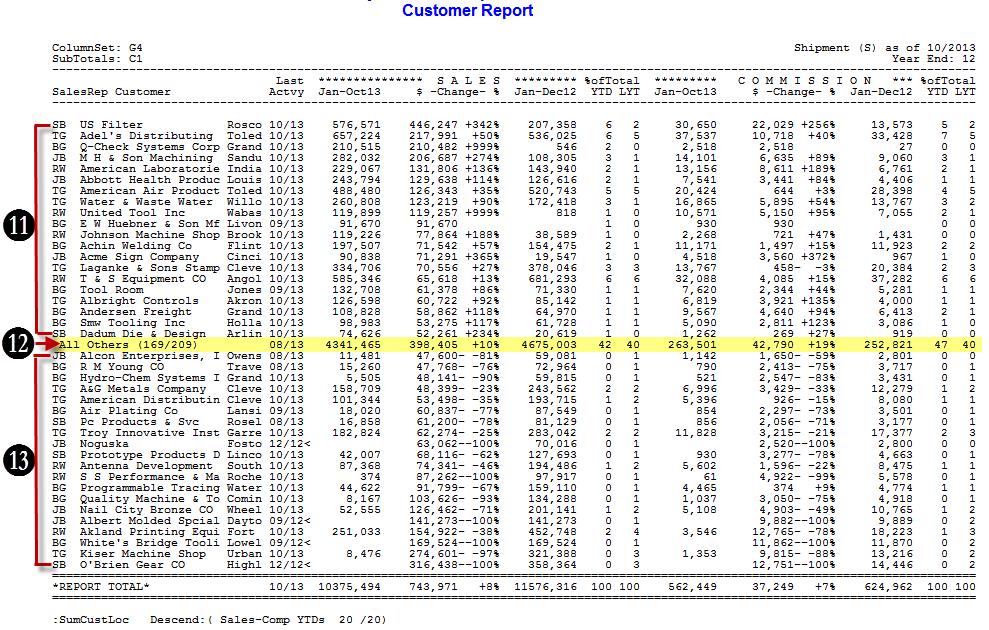
Using the Sales Analysis Report Generator we will demonstrate how you can create a sales and commission report that will summarize total agency performance and identify the top and bottom 20 customers based on year-to-date sales increase/decrease.

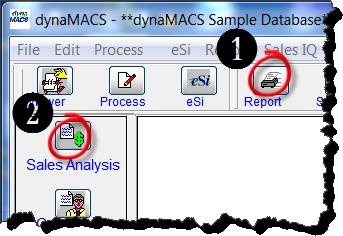
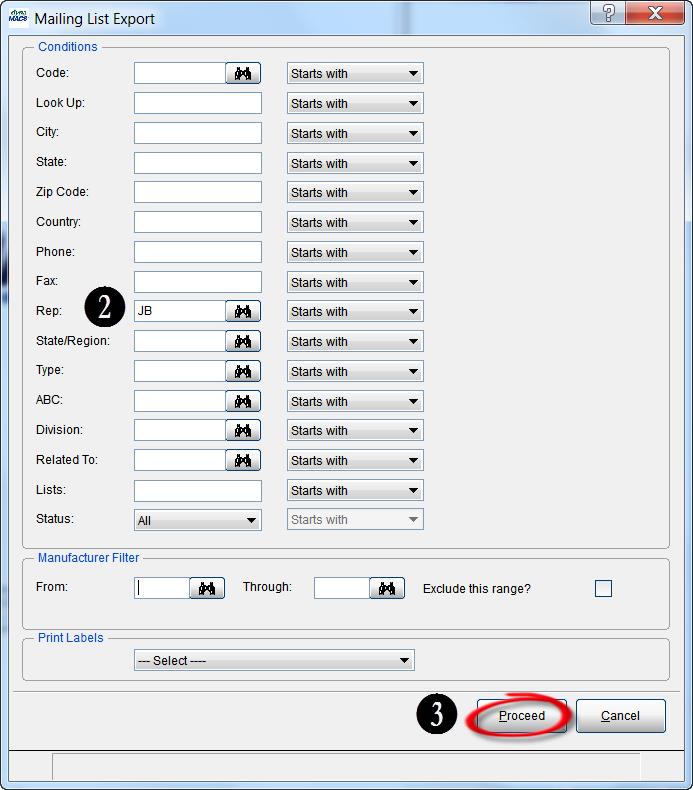
  1. From the dynaMACS main screen select the Reporticon and then the Sales Analysis icon.Main Screen
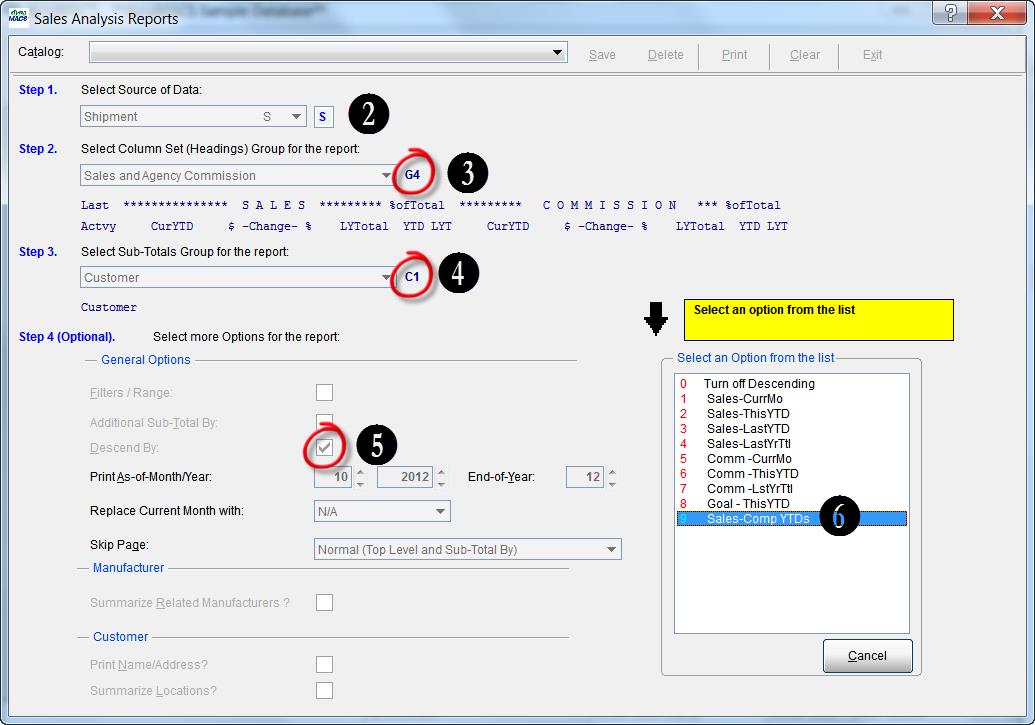
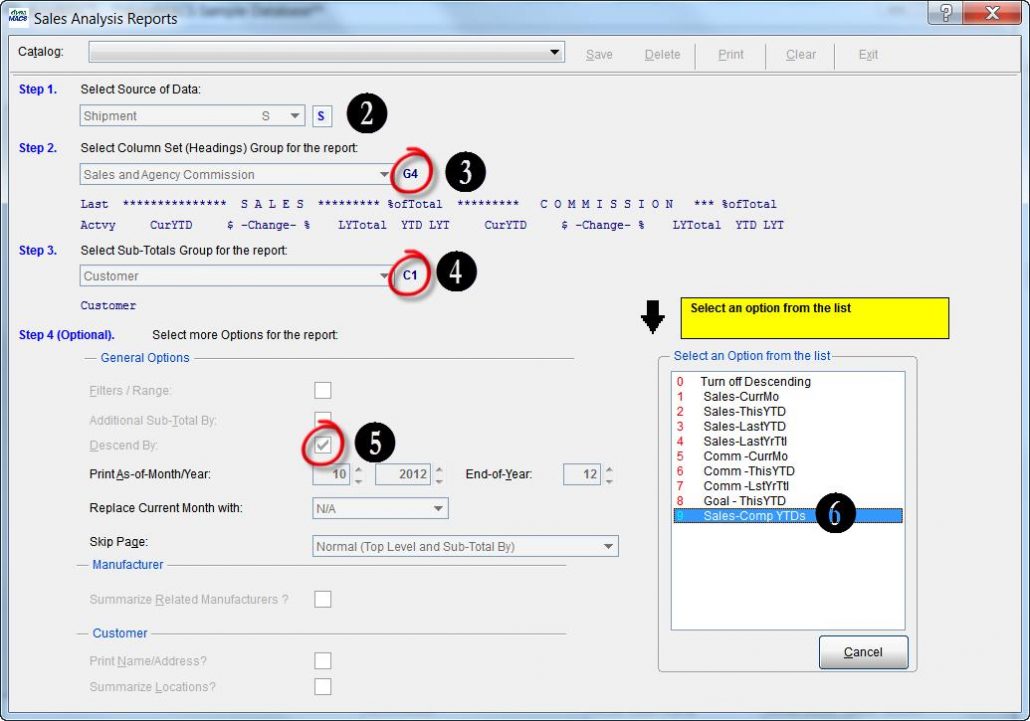
  2. Select Shipment for the Source of Data.
  3. Select the Column Set of Sales and Agency Commission then highlight G4.
  4. Select Sub-Totals Group of Customer then highlight C1
  5. Check the Descend By box
  6. Select Option 9 – Sales-Comp YTDs from the Descend By Options List.Sales Analysis Reports Screen 1
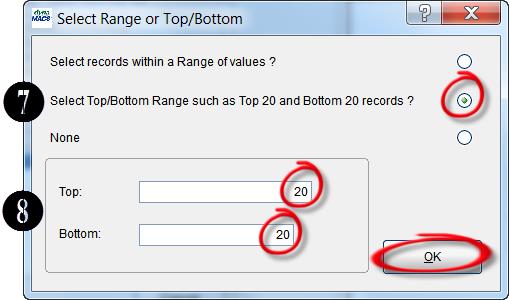
  7. In the Select Range or Top/Bottom dialog box select the Select Top/Bottom Range radio button.
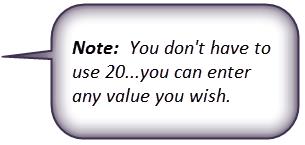
  8. Enter 20 in the Top field and in the Bottom field and select the OK button.Select Range Dialog Box Note
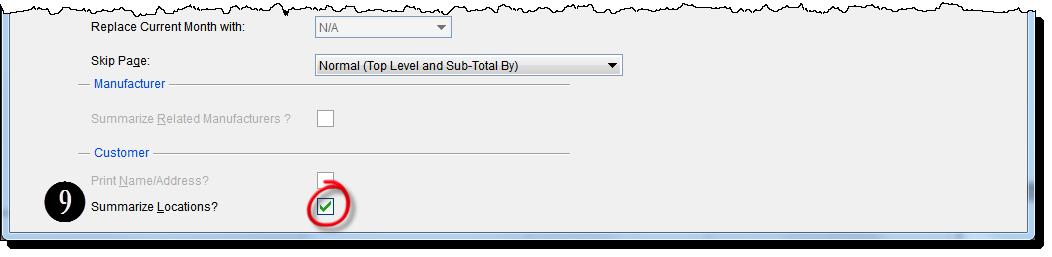
  9. Check the Summarize Locations box.  This will combine individual locations into a total for the headquarters for customers with multiple locations.Sales Analysis Reports Screen 2
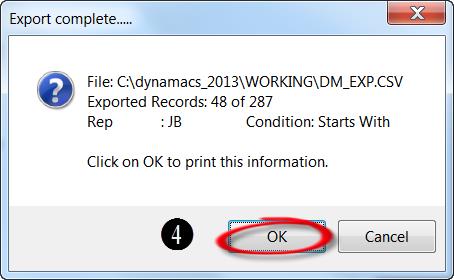
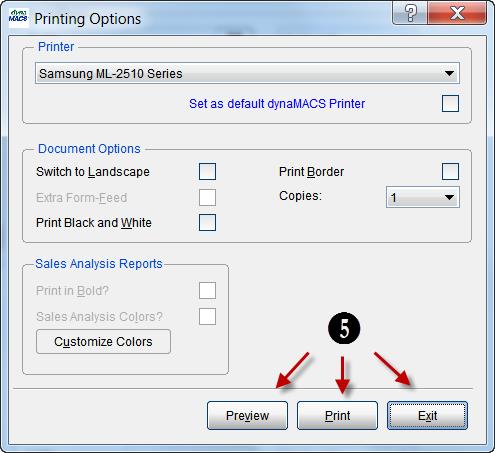
  10. Select the Print button.Sales Analysis Reports Screen 3
  11. The Top 20 customers are displayed with the greatest Y-T-D sales increase.
  12. A Summary of “All Other” customers is displayed
  13. The Bottom 20 customers are displayed with the greatest Y-T-D sales decrease.Sample Report

Tip #1306 – Using dynaMACS Mailing List Export

The dynaMACS Mailing List Export is a simple feature that allows you to create a customer list that can be exported for use in another program. This feature lets you target specific customers by filtering on data fields from the customer records in dynaMACS. You can also include or exclude customers that purchase from certain manufacturers.

The following example explains how to select the mailing list options in dynaMACS and export the file. In this example we will create a list of all customers in sales rep Jim Blacks territory.

Creating a List from the Mailing List Export Screen

  1. From the dynaMACS main screen select Tools>Mailing List ExportdynaMACS Main Screen
  2. In the Mailing List Export screen enter JB in the Rep field.
  3. Select the Proceed button.Mail List Export Screen
  4. The following dialog box will appear providing you with the export file location and the details of the records in the file.Export Complete Dialog Box  Note_Revised
  5. Next a Printing Options dialog box will appear. This is a confirmation of the file location and details which was displayed in the previous dialog box. You can select the Preview button to preview the details, the Print button to print the details or the Exit button to close the dialog box. Printing Options Screen
  6. To retrieve your file go to the file location which will be in the DYNAMACS/WORKING directory called DM_EXP.Filter_List

Tip #1305 – Did you know that you can add your company logo to your dynaMACS Reports?

By using the Preferences utility in dynaMACS you can set your logo to print on your reports. The logo file must be a bitmap (.BMP) and it is suggested that the bitmap format is 160 x 80 pixels.

Example of a report with your logo:

Example Report

  1. From the dynaMACS main screen select File>Preferences.Main DM Screen
  2. From the User Preference(s) screen with the Preferences field selected for #5 Default Bitmap to print on Reports, select the Browse button at the bottom of the screen to find the location and file name of the .bmp file for your logo. User Preferences Screen 1
  3. From the dialog box select the .bmp file (in this example we are using YourLogo.BMP.
  4. Select the Open button.File Manager Screen
  5. You will see the path and file name appear in preference field #5.
  6. Select the Save button and then select the Exit button.User Preferences Screen 2Note

Tip #1304 – Have you ever gotten stuck during sales entry not knowing where a sales rep override is coming from?

Overrides button during sales entry to view the hierarchy of sales rep overrides for the selected customer and then continue with your sales entry.  Sales rep overrides are generated from the X-Reference records.  An established “hierarchy” is used to determine which X-Reference record overrides another. The sales rep override screen shows all the X-Reference records used to determine the final override results.

To View Overrides During Sales Entry:

  1. During the sales entry process you can view the source of a sales rep override if present. To do so, simply select the Overrides look up button in the Sales Entry screen.

    NoteSales Entry Screen

  2. When this button is selected, the Sales Rep Hierarchy (or Overrides) screen is shown. This screen will display the order in which the existing overrides are processed from top to bottom.
  3. The bottom value in each column (being the final override results) is summarized in the Results row in this screen.
  4. Select the Exit  button to return to the Sales Entry screen where you left off and so you can continue with your sales entry.Sales Rep Overrides Screen 1

To View Overrides From the Main dynaMACS Screen:

  1. To view the Sales Rep Overrides, from the dynaMACS main screen select Edit>Mfg>Cust X-Reference>Display OverridesdynaMACS Main Screen
  2. The Sales Rep Hierarchy (or Overrides) screen is shown. This screen will display the order in which the existing overrides are processed from top to bottom.
  3. The bottom value in each column (being the final override results) is summarized in the Results row in this screen.
  4. Select the Exit button to close the Sales Rep Overrides screen.Sales Rep Overrides Screen 2

Tip #1303 – dynaMACS Software Help Resources

From within dynaMACS you can select the Help option and a complete list of resources is displayed. Some of these resources are documents that you can print and keep for quick reference. Others, such as our live demos, will take you directly to our website where you can view videos and FAQ’s. There are also some interactive resources such as checking for software updates and registering your dynaMACS software.Below is an outline of the resources available and how to access them.

To Access the Help Menu

  1. From the dynaMACS main screen select the Help option from the menu bar.Main Screen

List of Help Topics

Help Topic

What it Does

What’s New . . . Displays a .PDF file containing all of the enhancements and corrections for the latest version of dynaMACS.
Live Demos on our Website Opens the dynaMACS website displaying the webpage for viewing online demo videos.
Getting Started Opens a .PDF file with instructions on getting started with dynaMACS.
dynaHELP Opens a .PDF file of dynaHELP which contains help on all of the dynaMACS features.
Remote Support You may be asked to select this feature by a dynaCARE support rep which will enable them to direct connect to your computer via Team Viewer in order to trouble shoot any problems you are having.
Previous Release Notes Opens a .PDF file containing all of the enhancements and corrections from previous versions of dynaMACS.
FAQ’s on the web Opens the dynaMACS website displaying the webpage for Frequently Asked Questions (FAQ’s).
Show Tips Opens the dynaMACS website displaying the webpage for the dynaMACS Support Tips library.
Register dynaMACS Opens a dialog box which will send an email to dynaMACS to register your dynaMACS software program.
Check for software updates Opens a TrueUpdate dialog box to check for available software updates.
About dynaMACS Opens a dialog box displaying information about your dynaMACS software such as serial number, software version, etc.


Tip #1302 – Using SalesRep/ZipCode Maintenance to make adding customers even quicker and easier!

A new feature has been added which allows you to assign sales reps by zip code ranges. This feature will automatically assign the sales rep when adding a customer if the zip code has been assigned to a sales rep in the Sales Rep/Zip Code Maintenance screen.

Example

Jim Black is responsible for all customers in Kentucky (zip codes 40000-42999).  Let’s look at how simple it is to set up this zip code territory for him.

  1. Select Edit and Sales Rep Zip Codes from the dynaMACS main screen menu options to get to the SalesRep/ZipCode Maintenance screen.dynaMACS Main Screen
  2. Enter the Zipcode Start i.e. 40000 and select the <tab> key
  3. Enter the Zipcode End i.e. 42999 and select the <tab> key
  4. Enter the Description i.e. Kentucky and select the <tab> key
  5. Enter the Sales Rep code OR search for it by selecting the Binoculars button then enter the <tab> key
  6. Select the Save button.Zip Code Maint Screen  Note
  7. To review the records set up in SalesRep/ZipCode Maintenance you can select the arrow buttons in the lower left hand corner of the screen.
    • First_Record_dynaMACS    = Brings you to the first SalesRep/ZipCode record.
    • Last_Record_dynaMACS   = Brings you to the last SalesRep/ZipCode record.
    • Previous_Record_dynaMACS   = Brings you to the previous SalesRep/ZipCode record.
    • Next_Record_dynaMACS   = Brings you to the next SalesRep/ZipCode record

Auto Sales Rep assignment in Customer Maintenance

Once the zip codes and sales rep assignments have been entered into SalesRep/Zipcode Maintenance the sales rep will be automatically assigned when entering new customers in Customer Maintenance.

Example

  1. In the following example a new customer is being added in Customer Maintenance using the zip code 45222.Cust Main Screen 1
  2. After entering the zip code and selecting the <Tab> key or the <Enter> key, you will see that the Sales Rep field is automatically populated with Jim Black (JB) because he is assigned in the SalesRep/Zipcode Maintenance table. Cust Main Screen 2